
Computer Vision for Robotics (Vision Foundations) · Lesson 04
Image Preprocessing
Est. 55–70 min
Why
Why this lesson matters
Think of a dhobi before ironing: he first sprinkles water and smooths the cloth, then irons. If he ironed directly, the creases would get pressed in. Preprocessing is that smoothing step for images. It does not find the object — it makes the object easy to find.
In this lesson you build the most common pipeline in robot vision: gray → blur → threshold → morphology → biggest blob. You will measure each step against the true answer, see why a median blur beats a Gaussian blur for specks, why one global threshold fails under a desk lamp and how an adaptive threshold fixes it, and how opening and closing turn 38 blobs into exactly one. On the bench, you will apply the same idea to a light sensor: a list of readings with spikes, cleaned with an average and a median.
Concept
Blur, threshold, clean up
1. Why not just threshold?
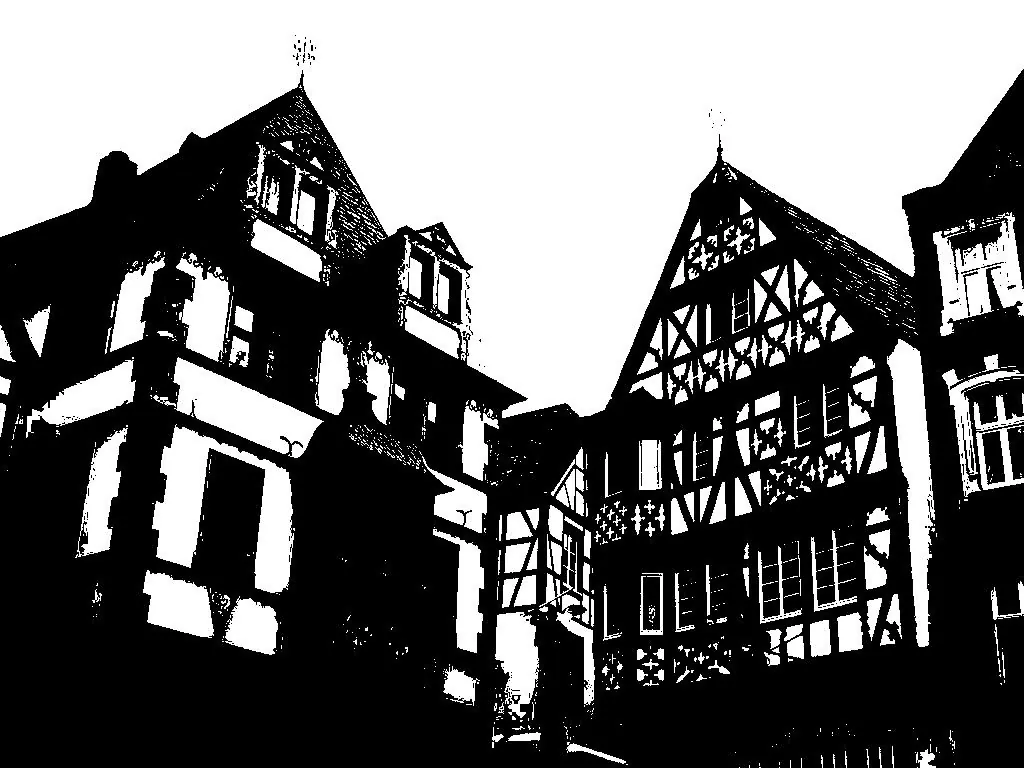
A threshold turns a grey image into a yes/no mask: every pixel brighter than T becomes 255, the rest 0 (or the opposite, with THRESH_BINARY_INV, for dark objects). It is fast and simple. But it judges every pixel alone. A noisy pixel that happens to dip below T becomes “object”. That is how 400 real block pixels come with hundreds of fake ones.
2. Blur: let neighbours vote
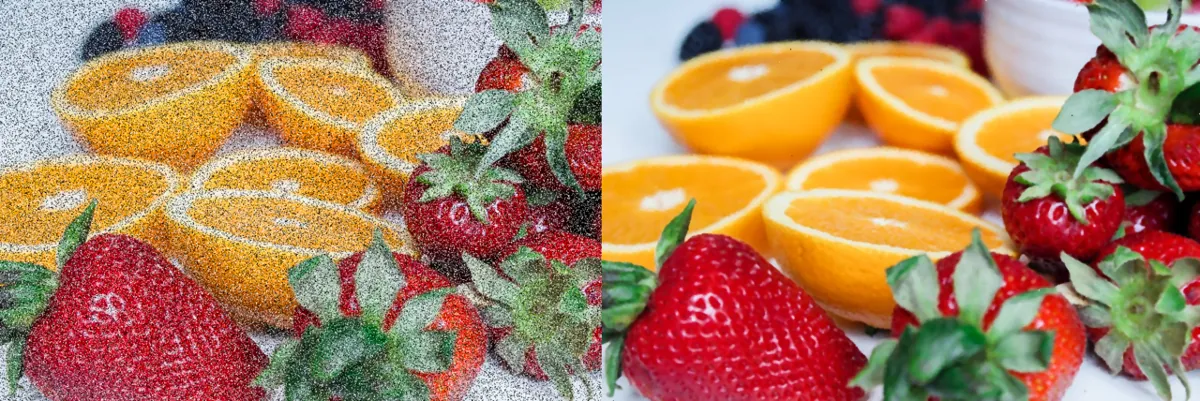
Blurring replaces each pixel with a combination of its neighbours — a small window called a kernel slides over the image. The OpenCV tutorial calls this a low-pass filter: it removes high-frequency content like noise (and, unfortunately, softens edges a little).
| Filter | OpenCV call | What it does | Use it for |
|---|---|---|---|
| Box (average) | cv.blur(img, (5, 5)) | plain average of the window | quick smoothing |
| Gaussian | cv.GaussianBlur(img, (5, 5), 0) | weighted average, centre counts most; kernel size must be odd | normal sensor noise |
| Median | cv.medianBlur(img, 5) | middle value of the window — always a real pixel value | salt-and-pepper specks, dead pixels |
| Bilateral | cv.bilateralFilter(img, 9, 75, 75) | averages only similar-brightness neighbours, keeps edges sharp; slower | smooth surfaces, keep outlines |
3. Threshold: global, Otsu and adaptive
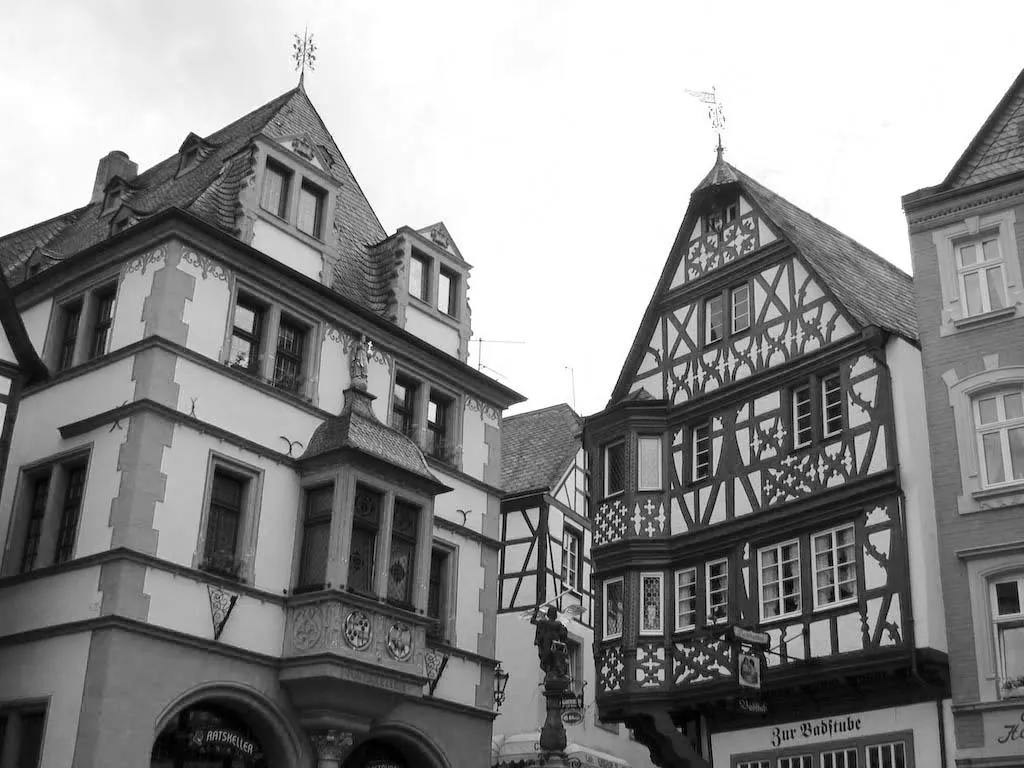
Global:
cv.threshold(gray, 127, 255, cv.THRESH_BINARY)You choose one number for the whole image. Fine when the light is even and you know your scene.
Otsu: add
+ cv.THRESH_OTSUOpenCV picks the number itself from the histogram — the value that best splits two peaks (object and background). It returns the chosen value as the first output. Works best on a blurred image with two clear groups.
Adaptive:
cv.adaptiveThreshold(...)A different threshold for every pixel: the mean (or Gaussian-weighted mean) of a
blockSizeneighbourhood minus C. This is the fix for uneven lighting — a lamp on one side, a shadow on the other.
4. Morphology: tidy the mask
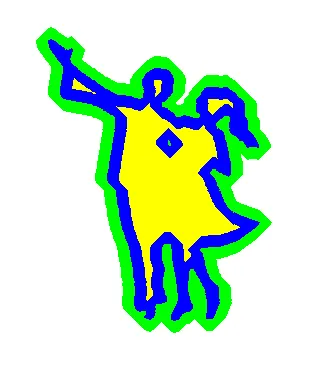
After thresholding, the mask is usually *almost* right: a few white dots outside, a few black holes inside. Morphological operations fix this using shape, not brightness. Keep the object white.
- Erode — a pixel stays white only if *all* pixels under the kernel are white. Shrinks objects, deletes small white dots.
- Dilate — a pixel becomes white if *any* pixel under the kernel is white. Grows objects, fills small gaps.
- Open = erode then dilate — removes small white noise, then gives the object its size back. Use it first.
- Close = dilate then erode — fills small black holes inside the object.
- Kernel:
cv.getStructuringElement(cv.MORPH_RECT, (5, 5))(also ELLIPSE and CROSS). Bigger kernel = stronger effect, but it can also erase small real objects.
Visual
Visualise it: raw → gray → blur → threshold
Educational preprocessing lab: the same synthetic image as raw, gray, blurred and thresholded. Move the sliders and watch noise appear and disappear. (Browser sim, not OpenCV.)
Interactive · Image preprocessing lab · Educational

Gray → blur → threshold is a classic educational path to a binary mask before edges/contours. Not a production OpenCV pipeline.
Code lab
Code lab: measure every step
preprocess_pipeline.py draws a 200 × 150 top view of the table with one dark 40 × 40 block, then adds sensor noise (σ = 12) and 2% black and 2% white specks — once under even tube-light and once with a desk lamp on the left. Because the program knows the true block, it can score every step: IoU (overlap with the truth, 1.00 = perfect), extra pixels, missed pixels and the number of blobs. No camera needed.
"""Stage 11 L04 - Image preprocessing: from a noisy, unevenly lit frame to a clean mask.

No camera needed. We draw a 200x150 "top view" of the lab table with ONE dark
block, then make it ugly the way a real webcam does:
  * uneven lighting (lamp on the left, shade on the right)
  * Gaussian sensor noise
  * salt-and-pepper specks (dust, dead pixels)
Then we try each preprocessing step and measure how close the mask is to the truth.
Run:  python3 preprocess_pipeline.py      (saves preprocess_steps.png)
"""
import time

import cv2 as cv
import numpy as np

H, W = 150, 200
rng = np.random.default_rng(7)          # fixed seed -> same numbers every run

# ---------- 1. The scene and the truth --------------------------------------------
truth = np.zeros((H, W), np.uint8)
cv.rectangle(truth, (120, 50), (159, 89), 255, -1)       # 40x40 block, on the shady side
TRUE_AREA = int(np.count_nonzero(truth))


def make_frame(light: np.ndarray) -> np.ndarray:
    """Dark block on a table under the given light, plus webcam-style noise."""
    scene = light.copy()
    scene[truth > 0] = light[truth > 0] * 0.45            # block reflects 45% of the light
    noisy = scene + rng.normal(0, 12, (H, W))             # sensor noise, sigma 12
    specks = rng.random((H, W))
    noisy[specks < 0.02] = 0                              # 2% black specks
    noisy[specks > 0.98] = 255                            # 2% white specks
    return np.clip(noisy, 0, 255).astype(np.uint8)


even = make_frame(np.full((H, W), 200.0))                         # tube light, even
uneven = make_frame(np.tile(np.linspace(230, 120, W), (H, 1)))    # desk lamp on the left
gray = even

print('1) Scenes')
for name, g in [('even  ', even), ('uneven', uneven)]:
    print(f'   {name}: table left={g[10:20, 5:15].mean():3.0f}  table right={g[10:20, 185:195].mean():3.0f}'
          f'  block={g[60:80, 130:150].mean():3.0f}')
print(f'   true block area = {TRUE_AREA} px')


def score(mask: np.ndarray) -> str:
    """Compare a mask (block = 255) with the truth."""
    m = mask > 0
    t = truth > 0
    tp = int(np.count_nonzero(m & t))
    fp = int(np.count_nonzero(m & ~t))
    fn = int(np.count_nonzero(~m & t))
    iou = tp / max(tp + fp + fn, 1)
    n, _ = cv.connectedComponents(mask)
    return f'IoU={iou:4.2f}  extra px={fp:5d}  missed px={fn:4d}  blobs={n - 1}'


# ---------- 2. Thresholds on the raw image ---------------------------------------
print('\n2) EVEN light: threshold the raw (noisy) image   [block is dark -> THRESH_BINARY_INV]')
_, fixed = cv.threshold(gray, 127, 255, cv.THRESH_BINARY_INV)
print(f'   fixed 127         : {score(fixed)}')
t_otsu, otsu = cv.threshold(gray, 0, 255, cv.THRESH_BINARY_INV + cv.THRESH_OTSU)
print(f'   Otsu (picked {t_otsu:3.0f}) : {score(otsu)}')

# ---------- 3. Blur first ----------------------------------------------------------
print('\n3) EVEN light: blur, then Otsu')
blurs = {
    'box 5x5     ': lambda g: cv.blur(g, (5, 5)),
    'Gaussian 5x5': lambda g: cv.GaussianBlur(g, (5, 5), 0),
    'median 5    ': lambda g: cv.medianBlur(g, 5),
    'bilateral 9 ': lambda g: cv.bilateralFilter(g, 9, 75, 75),
}
results = {}
for name, f in blurs.items():
    t0 = time.perf_counter()
    for _ in range(50):
        b = f(gray)
    ms = (time.perf_counter() - t0) / 50 * 1000
    t, m = cv.threshold(b, 0, 255, cv.THRESH_BINARY_INV + cv.THRESH_OTSU)
    results[name] = m
    print(f'   {name} -> Otsu {t:3.0f}: {score(m)}   ({ms:.2f} ms)')
print('   (median removes salt-and-pepper specks best; times depend on your computer)')

# ---------- 4. Uneven light: adaptive threshold -----------------------------------
print('\n4) UNEVEN light (lamp on the left, block in the shade)')
med = cv.medianBlur(uneven, 5)
t, g_otsu = cv.threshold(med, 0, 255, cv.THRESH_BINARY_INV + cv.THRESH_OTSU)
print(f'   median 5 -> Otsu {t:3.0f}: {score(g_otsu)}   <- ONE global number cannot fit both sides')
for block, C in [(11, 2), (51, 10), (101, 10)]:
    a = cv.adaptiveThreshold(med, 255, cv.ADAPTIVE_THRESH_MEAN_C, cv.THRESH_BINARY_INV, block, C)
    print(f'   blockSize={block:3d} C={C:2d}: {score(a)}')
    if block == 51:
        adaptive = a
print('   blockSize 11 is smaller than the 40 px block: it only sees the EDGE (hollow box).')
print('   Rule of thumb: blockSize (odd) a bit bigger than the object you want to keep solid.')

# ---------- 5. Morphology: tidy the mask ------------------------------------------
print('\n5) Morphology on the adaptive (51, 10) mask, 5x5 kernel')
k = cv.getStructuringElement(cv.MORPH_RECT, (5, 5))
m0 = adaptive
opened = cv.morphologyEx(m0, cv.MORPH_OPEN, k)
clean = cv.morphologyEx(opened, cv.MORPH_CLOSE, k)
print(f'   before   : {score(m0)}')
print(f'   + open   : {score(opened)}')
print(f'   + close  : {score(clean)}')

# ---------- 6. The final answer: where is the block? ------------------------------
n, labels, stats, cents = cv.connectedComponentsWithStats(clean)
big = 1 + int(np.argmax(stats[1:, cv.CC_STAT_AREA]))
x, y, w, h, area = stats[big]
cx, cy = cents[big]
print('\n6) Result')
print(f'   biggest blob: x={x} y={y} w={w} h={h} area={area} px  centre=({cx:.1f}, {cy:.1f})')
print('   truth       : x=120 y=50 w=40 h=40 area=1600 px  centre=(139.5, 69.5)')

# ---------- 7. Save the steps side by side ----------------------------------------
row = np.hstack([uneven, med, m0, clean])
cv.imwrite('preprocess_steps.png', row)
cv.imwrite('uneven_frame.png', uneven)
print('\nSaved preprocess_steps.png  (uneven noisy | median | adaptive mask | cleaned mask)')
print('Saved uneven_frame.png      (try it in preprocess_tuner.py --image uneven_frame.png)')
Output (python3 preprocess_pipeline.py, tested with opencv-python 5.0 — your ms timings will differ)
1) Scenes
   even  : table left=199  table right=195  block= 89
   uneven: table left=223  table right=124  block= 71
   true block area = 1600 px

2) EVEN light: threshold the raw (noisy) image   [block is dark -> THRESH_BINARY_INV]
   fixed 127         : IoU=0.73  extra px=  561  missed px=  19  blobs=499
   Otsu (picked 128) : IoU=0.73  extra px=  561  missed px=  18  blobs=499

3) EVEN light: blur, then Otsu
   box 5x5      -> Otsu 146: IoU=0.99  extra px=   14  missed px=  10  blobs=1   (0.02 ms)
   Gaussian 5x5 -> Otsu 144: IoU=0.99  extra px=   17  missed px=   4  blobs=10   (0.01 ms)
   median 5     -> Otsu 114: IoU=0.99  extra px=    0  missed px=  11  blobs=1   (0.08 ms)
   bilateral 9  -> Otsu 136: IoU=0.74  extra px=  561  missed px=   9  blobs=499   (0.47 ms)
   (median removes salt-and-pepper specks best; times depend on your computer)

4) UNEVEN light (lamp on the left, block in the shade)
   median 5 -> Otsu 163: IoU=0.13  extra px=10438  missed px=   0  blobs=14   <- ONE global number cannot fit both sides
   blockSize= 11 C= 2: IoU=0.10  extra px= 8034  missed px= 666  blobs=579
   blockSize= 51 C=10: IoU=0.93  extra px=  107  missed px=  12  blobs=38
   blockSize=101 C=10: IoU=0.86  extra px=  248  missed px=  11  blobs=37
   blockSize 11 is smaller than the 40 px block: it only sees the EDGE (hollow box).
   Rule of thumb: blockSize (odd) a bit bigger than the object you want to keep solid.

5) Morphology on the adaptive (51, 10) mask, 5x5 kernel
   before   : IoU=0.93  extra px=  107  missed px=  12  blobs=38
   + open   : IoU=0.99  extra px=    0  missed px=  12  blobs=1
   + close  : IoU=0.99  extra px=    0  missed px=  12  blobs=1

6) Result
   biggest blob: x=120 y=50 w=40 h=40 area=1588 px  centre=(139.5, 69.5)
   truth       : x=120 y=50 w=40 h=40 area=1600 px  centre=(139.5, 69.5)

Saved preprocess_steps.png  (uneven noisy | median | adaptive mask | cleaned mask)
Saved uneven_frame.png      (try it in preprocess_tuner.py --image uneven_frame.png)
Try it: switch Raw → Gray → Blur → Threshold, then move the blur radius and threshold sliders. Find the threshold range where the shape is clean. (Educational browser sim.)
Interactive · Image preprocessing lab · Educational
Gray → blur → threshold is a classic educational path to a binary mask before edges/contours. Not a production OpenCV pipeline.
preprocess_tuner.py — tune on your own camera
Numbers that work on a synthetic image will need tuning on your table. preprocess_tuner.py runs the same pipeline (median → adaptive threshold → open → close → biggest blob) on the webcam or a photo, with trackbars for blur, blockSize, C and kernel. It draws a green box and red centre on the biggest blob and shows the blob count. Press s to print the settings to copy into your code. --once runs without any window, for SSH or a Raspberry Pi.
"""Stage 11 L04 - Tune a preprocessing pipeline live (or headless with --once).

Pipeline: gray -> median blur -> adaptive threshold (INV: dark objects = white)
          -> open -> close -> biggest blob.
Webcam:  python3 preprocess_tuner.py
Photo :  python3 preprocess_tuner.py --image preprocess_steps.png
No GUI:  python3 preprocess_tuner.py --image my.png --once --blur 5 --block 51 --c 10 --kernel 5
Keys  :  s = print the current settings as code,  q / Esc = quit
"""
import argparse

import cv2 as cv
import numpy as np


def odd(n: int, lo: int) -> int:
    n = max(n, lo)
    return n if n % 2 == 1 else n + 1


def run(frame: np.ndarray, blur: int, block: int, c: int, kernel: int):
    gray = cv.cvtColor(frame, cv.COLOR_BGR2GRAY) if frame.ndim == 3 else frame
    b = cv.medianBlur(gray, odd(blur, 1)) if blur > 1 else gray
    mask = cv.adaptiveThreshold(b, 255, cv.ADAPTIVE_THRESH_MEAN_C, cv.THRESH_BINARY_INV,
                                odd(block, 3), c)
    if kernel > 1:
        k = cv.getStructuringElement(cv.MORPH_RECT, (kernel, kernel))
        mask = cv.morphologyEx(mask, cv.MORPH_OPEN, k)
        mask = cv.morphologyEx(mask, cv.MORPH_CLOSE, k)
    n, _, stats, cents = cv.connectedComponentsWithStats(mask)
    if n <= 1:
        return mask, n - 1, None
    i = 1 + int(np.argmax(stats[1:, cv.CC_STAT_AREA]))
    return mask, n - 1, (tuple(int(v) for v in stats[i][:5]), tuple(float(v) for v in cents[i]))


def report(blobs, best, s):
    print(f'settings: medianBlur {odd(s[0], 1)}, adaptiveThreshold block {odd(s[1], 3)} C {s[2]}, '
          f'open/close {s[3]}x{s[3]}  ->  blobs={blobs}')
    if best:
        (x, y, w, h, a), (cx, cy) = best
        print(f'biggest blob: x={x} y={y} w={w} h={h} area={a}  centre=({cx:.1f}, {cy:.1f})')
    else:
        print('no blob found - lower C or check the image')


def main() -> None:
    ap = argparse.ArgumentParser()
    ap.add_argument('--image')
    ap.add_argument('--camera', type=int, default=0)
    ap.add_argument('--once', action='store_true', help='no window: run once and print')
    ap.add_argument('--blur', type=int, default=5)
    ap.add_argument('--block', type=int, default=51)
    ap.add_argument('--c', type=int, default=10)
    ap.add_argument('--kernel', type=int, default=5)
    a = ap.parse_args()
    settings = [a.blur, a.block, a.c, a.kernel]

    still = None
    if a.image:
        still = cv.imread(a.image)
        if still is None:
            raise SystemExit(f'could not read {a.image}')
    if a.once:
        if still is None:
            raise SystemExit('--once needs --image')
        _, blobs, best = run(still, *settings)
        report(blobs, best, settings)
        return

    cap = None if still is not None else cv.VideoCapture(a.camera)
    if cap is not None and not cap.isOpened():
        raise SystemExit('camera not found - try --camera 1 or --image file.png')
    cv.namedWindow('mask')
    for name, i, mx in [('blur', 0, 15), ('block', 1, 201), ('C', 2, 40), ('kernel', 3, 15)]:
        cv.createTrackbar(name, 'mask', settings[i], mx, lambda v: None)
    while True:
        frame = still if still is not None else cap.read()[1]
        if frame is None:
            print('camera returned no frame')
            break
        s = [cv.getTrackbarPos(n, 'mask') for n in ('blur', 'block', 'C', 'kernel')]
        mask, blobs, best = run(frame, *s)
        view = frame.copy() if frame.ndim == 3 else cv.cvtColor(frame, cv.COLOR_GRAY2BGR)
        if best:
            (x, y, w, h, _), (cx, cy) = best
            cv.rectangle(view, (x, y), (x + w, y + h), (0, 255, 0), 2)
            cv.circle(view, (int(cx), int(cy)), 4, (0, 0, 255), -1)
        cv.putText(view, f'blobs={blobs}', (8, 20), cv.FONT_HERSHEY_SIMPLEX, 0.6, (0, 255, 255), 2)
        cv.imshow('frame', view)
        cv.imshow('mask', mask)
        key = cv.waitKey(30) & 0xFF
        if key == ord('s'):
            report(blobs, best, s)
        if key in (ord('q'), 27):
            break
    if cap is not None:
        cap.release()
    cv.destroyAllWindows()


if __name__ == '__main__':
main()python3 preprocess_pipeline.py # also saves uneven_frame.png
python3 preprocess_tuner.py --image uneven_frame.png --once
# settings: medianBlur 5, adaptiveThreshold block 51 C 10, open/close 5x5 -> blobs=1
# biggest blob: x=120 y=50 w=40 h=40 area=1588 centre=(139.5, 69.5)
python3 preprocess_tuner.py --image uneven_frame.png --once --block 11 --c 2 --kernel 1
# ... blobs=579 <- too small a block, no cleaning
python3 preprocess_tuner.py # live webcam with trackbarsBench build: preprocessing in one dimension
One row of an image is just a list of numbers. A light sensor read many times is also a list of numbers — so the same filters work. ldr_spike_filter.ino reads an LDR, and every 10th reading replaces it with a fake spike (0 or 1023), like a dead pixel. It prints raw, a 5-reading average and a 5-reading median for the Serial Plotter. You will see the average jump at every spike, while the median ignores it — exactly what medianBlur did to the specks in the code lab.
| Part | Connection | Note |
|---|---|---|
| LDR | 5 V → LDR → A0 | same divider as Lesson 2 |
| 10 kΩ resistor | A0 → 10 kΩ → GND | pull-down; the divider draws well under 1 mA |
| Serial Plotter | 115200 baud | three lines: raw, average5, median5; send p to toggle spikes |
| Safety | nothing else on the pins | sensors only — never motors, lamps or LED strips on a GPIO |
// Stage 11 L04 - Preprocessing in 1-D: average vs median on a light sensor.
// An image row is just a list of numbers. Blurring an image = smoothing that list.
// Here an LDR gives a live "1-pixel row"; every 10th reading we add a fake spike
// (like a white speck / dead pixel) so you can see which filter removes it.
//
// Wiring (all low-current, safe for the UNO pins):
//   5V -> LDR -> A0 -> 10k resistor -> GND      (voltage divider, as in Lesson 2)
//   Nothing else. No motors or lamps on any pin.
// Open Serial Plotter at 115200: raw, average5, median5.

const byte LDR_PIN = A0;
const byte N = 5;            // window size, like a 5x5 kernel but in 1-D
int win[N];
byte idx = 0;
unsigned long count = 0;
bool spikes = true;          // send 'p' in Serial Monitor to toggle spikes

int median5(const int *v) {
  int t[N];
  for (byte i = 0; i < N; i++) t[i] = v[i];
  for (byte i = 1; i < N; i++) {           // tiny insertion sort
    int x = t[i];
    int j = i - 1;
    while (j >= 0 && t[j] > x) { t[j + 1] = t[j]; j--; }
    t[j + 1] = x;
  }
  return t[N / 2];
}

void setup() {
  Serial.begin(115200);
  int first = analogRead(LDR_PIN);
  for (byte i = 0; i < N; i++) win[i] = first;
  Serial.println(F("raw average5 median5"));
}

void loop() {
  if (Serial.available()) {
    char c = Serial.read();
    if (c == 'p') spikes = !spikes;
  }
  int raw = analogRead(LDR_PIN);
  count++;
  if (spikes && count % 10 == 0) raw = (raw > 511) ? 0 : 1023;   // fake speck
  win[idx] = raw;
  idx = (idx + 1) % N;

  long sum = 0;
  for (byte i = 0; i < N; i++) sum += win[i];
  int avg = sum / N;
  int med = median5(win);

  Serial.print(raw); Serial.print(' ');
  Serial.print(avg); Serial.print(' ');
  Serial.println(med);
  delay(40);   // about 25 readings per second
}Debugging
| Symptom | Likely cause | Fix |
|---|---|---|
| Hundreds of tiny blobs | no blur, or no opening | medianBlur 5 before threshold; MORPH_OPEN after |
| Object is white but you wanted it black (or reverse) | BINARY vs BINARY_INV | Dark object on light table → THRESH_BINARY_INV |
| Half the table becomes object | uneven light + global threshold | Adaptive threshold, or even out the lighting |
| Object is a hollow box | adaptive blockSize smaller than the object | Increase blockSize (odd) beyond the object size |
error: (-215) ... ksize / odd size | even kernel size for Gaussian/median | Use 3, 5, 7… |
| Small real objects vanish | opening kernel too big | Use a smaller kernel or fewer iterations |
| Pipeline too slow on a Pi | bilateral filter or big frames | Resize first; prefer median/Gaussian |
Real world
Preprocessing in real machines
- Document scanning apps: a page photographed under a room light is brighter in the middle than at the corners — adaptive thresholding gives clean black text on white everywhere (the OpenCV tutorial shows this on a Sudoku photo).
- Factory inspection: machines use their own controlled lights so that a simple global threshold keeps working all day. Fixing the light is often cheaper than fixing the code.
- Your lab arm: blur → threshold → open/close → biggest blob gives the block’s centre in pixels. Lessons 12–13 (calibration and perspective) turn that pixel into centimetres on the table, and the Lesson 16 capstone makes the arm pick it.
- Sensors everywhere: the median trick from the bench build is used on distance sensors, encoders and microphone levels — any signal with occasional wild readings.
Think
Think about it
Think
Your block is small (12 × 12 px) and the camera is noisy. You add a 9 × 9 opening and the block disappears. What happened, and what would you change?
Experiment
Try it in the lab
About 50 minutes. Python part needs NumPy and OpenCV; camera part needs a webcam, a dark block on a light surface and a desk lamp; bench part needs an Arduino UNO, an LDR and a 10 kΩ resistor.
Experiment
Clean mask under two lights
You will need
- `preprocess_pipeline.py`, `preprocess_tuner.py` (opencv-python, numpy)
- Webcam, dark block, white sheet of paper, desk lamp
- Image preprocessing lab (browser)
- Bench: Arduino UNO, LDR, 10 kΩ resistor
Steps
- Run `preprocess_pipeline.py`. Change the speck amount from 2% to 10%. Which blur still gives 1 blob?
- Change the noise σ from 12 to 30. Does Otsu still pick a good value after a Gaussian blur?
- In the browser lab, find the lowest and highest threshold that still give a clean shape.
- Webcam: put the block on white paper under the room light. Run the tuner and get blobs = 1. Press `s` and note the settings.
- Switch on the desk lamp from one side. Does it still say 1 blob? Retune blockSize and C until it does.
- Bench: run `ldr_spike_filter.ino` in the Serial Plotter, compare average5 and median5 with spikes on and off.
Interactive · Image preprocessing lab · Educational
Gray → blur → threshold is a classic educational path to a binary mask before edges/contours. Not a production OpenCV pipeline.
Blur removes noise before it becomes fake objects; median is the best against specks. A global threshold works only when the light is even; adaptive works under a lamp if blockSize is bigger than the object. Opening and closing tidy the last pixels. Measured numbers (blobs, IoU, centre) tell you more than looking.
Knowledge check
Check your understanding
Knowledge check
1. Which blur is best for salt-and-pepper specks?
2. What must be true of the kernel size for GaussianBlur and medianBlur?
3. What does adding `cv.THRESH_OTSU` do?
4. A lamp lights one side of the table. Best choice?
5. Your adaptive mask shows only the outline of the block. Why?
6. Opening is…
7. Which removes small black holes inside a white object?
8. On the bench, why does median5 ignore a single spike but average5 does not?
Mini assignment
Hands-on assignment
Mini assignment
A preprocessing recipe for your table
Find and justify settings that give exactly one clean blob for your block, under both room light and a side lamp.
Deliverables
- Your final settings (blur, threshold type, blockSize/C or T, kernel) and a short reason for each.
- Four screenshots: raw, after blur, after threshold, after open/close — for both lighting conditions.
- The printed blob box and centre for 3 different block positions.
- A table of `preprocess_pipeline.py` results when you change specks to 5% and 10%.
- Optional (bench): a Serial Plotter screenshot with raw, average5 and median5.
Do this, step by step
- Run
preprocess_pipeline.pywith specks at 2%, 5% and 10%; fill a table of blobs found for each blur. - Put your block on white paper under room light; run
preprocess_tuner.pyuntil it says blobs = 1, and presss. - Switch on the side lamp and retune blockSize and C until it is 1 blob again.
- Save the four screenshots (raw, blur, threshold, open/close) for both lights.
- Move the block to 3 positions and write the printed box and centre each time.
Stuck? Hints, one at a time
- Salt-and-pepper specks are removed best by
medianBlur; a Gaussian blur only smears them. - Uneven light from one side needs an adaptive threshold — one global value cannot fit both the bright and the dark side.
- blockSize must be odd and bigger than the block’s edge width; if small specks stay, use a bigger open kernel.
Challenges (pick by level)
- 🟢 Beginner: Add
cv.GaussianBlurwith sizes 3, 5, 9 and 15 to Part 3 and print IoU for each. - 🟡 Intermediate: Add a light block on a dark table to the scene. Which threshold type (BINARY or BINARY_INV) do you need now?
- 🟠 Advanced: Use
ADAPTIVE_THRESH_GAUSSIAN_Cand compare with MEAN_C for blockSize 31–151. Plot IoU vs blockSize. - 🔴 Expert: Write
otsu(hist)yourself from the formula in the OpenCV thresholding tutorial and check it returns the same value ascv.threshold(..., THRESH_OTSU). - ⚫ Research: Remove the uneven light *before* thresholding: estimate the background with a very large blur (or morphological opening) and divide or subtract it. Compare with adaptive thresholding; cite your sources.
Next step
You now have a clean mask and a blob. But many objects are not one solid colour or brightness — they are known by their edges, corners and shapes. In Lesson 5 — Edges, Features & Shapes you will find outlines with Canny and contours, and tell a square from a circle.
Sources
- OpenCV 4.x — Smoothing Images —
filter2D,blur,GaussianBlur(positive odd kernel),medianBlurfor salt-and-pepper noise,bilateralFilterkeeps edges but is slower. - OpenCV 4.x — Image Thresholding —
thresholdtypes, adaptive MEAN_C/GAUSSIAN_C with blockSize and C, Otsu’s binarization and blur-before-Otsu. - OpenCV 4.x — Morphological Transformations — erosion, dilation, opening, closing,
getStructuringElement. - OpenCV 4.x — Getting Started with Videos —
VideoCaptureloop used by the tuner. - Photos: Wikimedia Commons (credits under each image).
Look back: Lesson 3: Images, Pixels & Color Spaces. Next: Lesson 5: Edges, Features & Shapes. Related: Stage 11 — Computer Vision, Stage 13 — Perception, Planning & Manipulation.
Self-attested for now — keep artifacts in your lab notebook.
Complete
Today's goal
0 of 1 done today
Mark this lesson complete when you have worked the experiment, knowledge check, and assignment (even roughly).