
Electronics & Embedded Systems · Lesson 11
Arduino & Embedded Programming
Est. 50–65 min
Why
Why the shape of your code matters as much as the wiring
You have used small Arduino sketches in every lesson of this stage. Now we look at how a sketch is really built: what setup() and loop() mean, how code gets from your laptop into the microcontroller’s flash, how to talk to the board through the Serial Monitor, how to keep time without delay(), and how to fit inside the Uno’s 2 KB of SRAM. These habits decide whether a robot reacts in 1 millisecond or in 2 seconds.
By the end you will be able to: read and write the parts of a sketch (comments, variables, functions); explain when setup() and loop() run; verify and upload with the Arduino IDE, choosing the right board and port; print debug messages with Serial; replace blocking delay() with millis() timing that survives rollover; use map() and constrain() correctly; read the IDE’s memory report and save SRAM with F(); and structure a robot sketch as small, fast, non-blocking tasks with safety first.
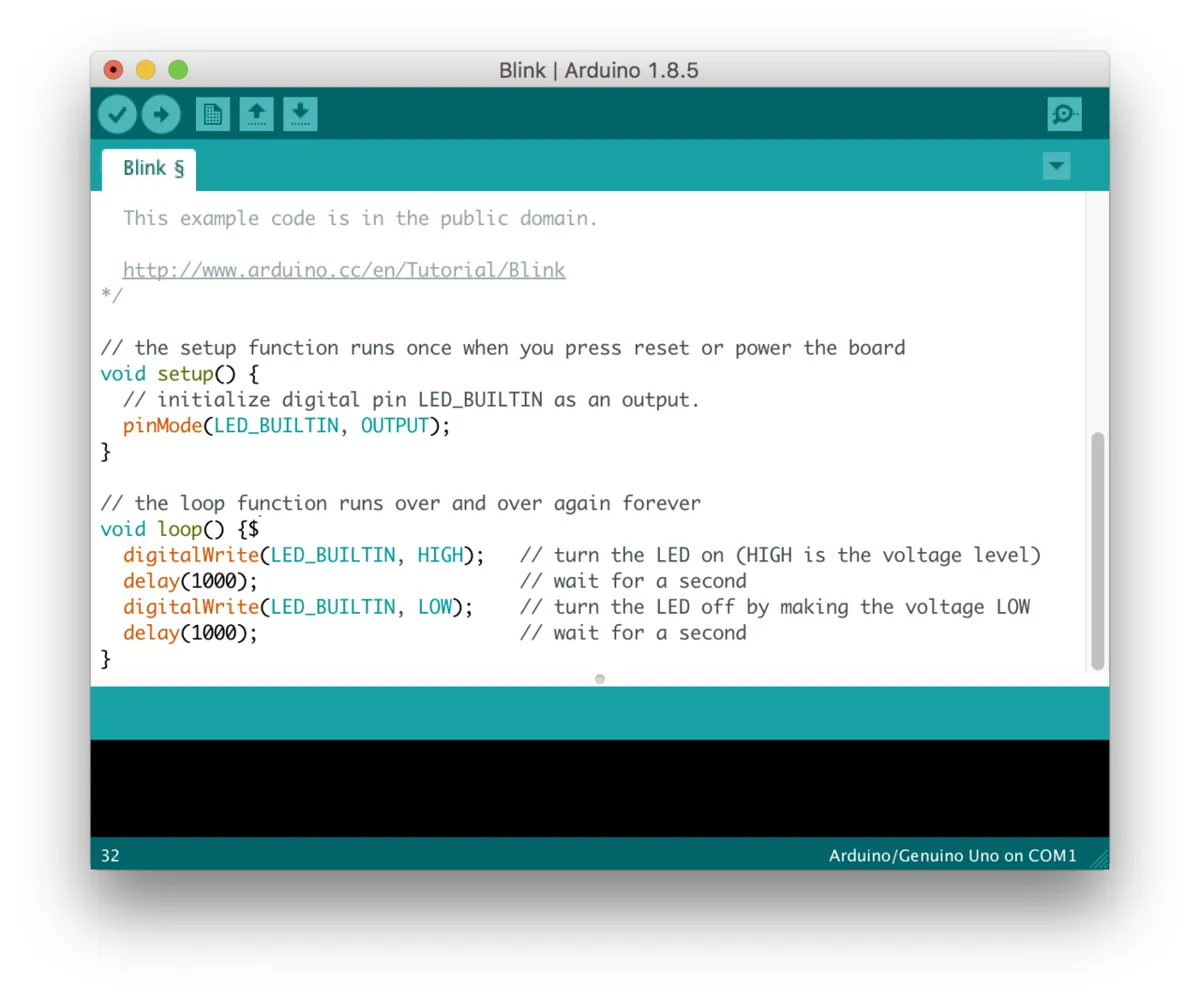
setup() runs once and sets the built-in LED pin as an output; loop() turns the LED on, waits a second, turns it off, waits a second — and repeats for ever. Every sketch you write follows this pattern.Photo: Cedar101 · CC0 1.0 · Source: Wikimedia Commons · resized, converted to WebPConcept
A sketch in plain words: set up once, then loop for ever
Think of a school day. In the morning assembly (setup()) you do things once: attendance, announcements, setting up the day. Then the timetable (loop()) runs period after period, all day, until the bell rings — except a microcontroller’s day never ends until the power goes off or someone presses reset. Arduino’s reference says it exactly: setup() is called when a sketch starts, runs once after each power-up or reset, and is used to initialise variables, pin modes and libraries; loop() then loops consecutively, letting your program change and respond.
The parts of a sketch
Arduino’s “Sketches” guide calls a sketch the unit of code that is uploaded to and run on a board, and walks through Blink line by line. Comments (/* … */ or // …) are ignored by the board and written for people. Variables have a name, a type and a value — like int ledPin = 13;. Functions are named blocks of code: you define setup() and loop(), and you call functions such as pinMode() and digitalWrite() with parameters. The Blink example uses LED_BUILTIN, a constant defined for each board so the same sketch finds the built-in LED on different boards.
| Function | What it does | Lesson |
|---|---|---|
| pinMode(pin, INPUT / OUTPUT / INPUT_PULLUP) | Sets how a digital pin behaves | 7 |
| digitalWrite(pin, HIGH / LOW), digitalRead(pin) | Digital out and in | 7 |
| analogRead(pin) | ADC reading, 0–1023 on an Uno | 8 |
| analogWrite(pin, 0–255) | PWM duty on a ~ pin | 9 |
| map(x, inLo, inHi, outLo, outHi) | Rescales a number with integer maths; does NOT limit it | 8–9 |
| constrain(x, lo, hi) | Clamps a number into a range — use it for soft limits | 9 |
| millis(), micros() | Time since the program started | 10–11 |
| Serial.begin(baud), Serial.print() | Talk to the computer over USB | 11 |
Types matter on a small chip
Arduino’s int reference: on the Uno and other ATmega boards an int is 16 bits, from −32 768 to 32 767; on 32-bit boards it is 32 bits. So a time in milliseconds overflows an Uno int after about 33 seconds. That is why the millis() reference insists on unsigned long, which counts to about 4.29 billion before it wraps back to zero — after roughly 50 days.
Upload
From your laptop to the chip: verify, upload, Serial Monitor
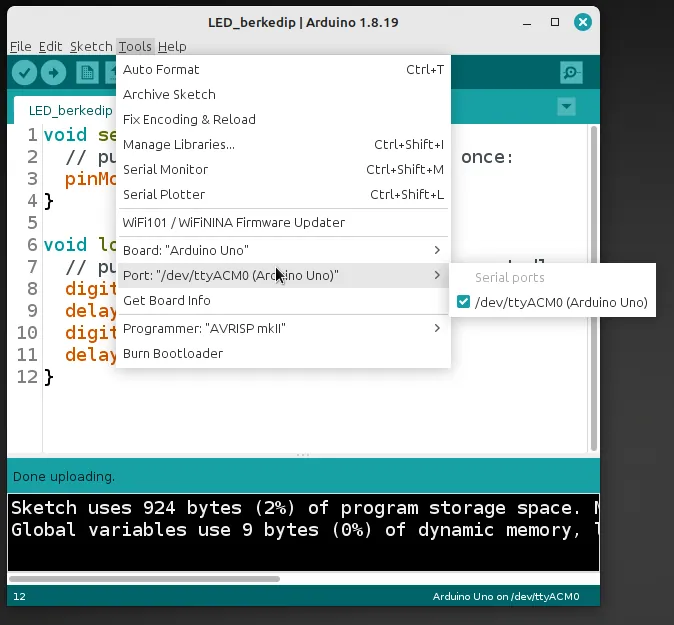
Arduino’s IDE 2 guide describes two buttons: Verify (the tick) checks and compiles your sketch; Upload (the arrow) compiles it and then sends it to the board. Verify first — it is the quickest way to catch mistakes. Before uploading you choose the board and the port it is connected to; the board name appears in bold when the IDE can see it.
Connect
Plug the board in with a data-capable USB cable.
Pick board and port
Choose your exact board and its port (COM… on Windows, /dev/ttyACM… or /dev/ttyUSB… on Linux).
Verify
Click the tick. Fix any red errors from the top one down.
Upload
Click the arrow. Wait for “Done uploading” and read the memory report.
Serial Monitor
Open it and set the same baud rate as
Serial.begin()in your sketch, or you will see garbage.
The Serial reference adds three warnings worth remembering. On older boards (Uno, Nano, Mini, Mega) pins 0 and 1 carry the USB serial link — connecting anything to them can interfere and even cause failed uploads. The TX/RX pins use TTL logic levels (5 V or 3.3 V depending on the board) — never connect them straight to an old RS-232 port, which uses ±12 V. And the Serial Monitor must use the same baud rate as begin().
Non-blocking
Never nap on the job: millis() instead of delay()
Arduino’s delay() reference is honest about the problem: during delay(), no other reading of sensors, calculations or pin changes can happen — it brings most activity to a halt. (PWM keeps running and interrupts still work, because those are hardware.) It points to the Blink Without Delay example as the alternative: remember when something last happened, and on every pass of loop() ask “has enough time passed?”
if (millis() − previous ≥ interval) { previous = millis(); doTheTask(); }
- previous and interval are unsigned long
- Subtracting first is rollover-safe: unsigned maths gives the right gap even when millis() wraps to 0
- Each task gets its own ‘previous’ — you can run many tasks at different rates in one loop()
| With delay() | With millis() | |
|---|---|---|
| How loop() spends its time | Mostly asleep inside delay() | Hundreds or thousands of quick passes per second |
| Worst wait before the stop button is seen | Up to the total delay in one pass (2 s for him) | One quick pass (about a millisecond or less) |
| Adding a second task | Delays add up; everything slows | Add another ‘if (time passed)’ block |
| Good for | A tiny demo with nothing else to do | Every robot sketch |
Memory
Living in 2 KB: reading the memory report and saving SRAM
The IDE’s two-line report after every compile is your memory meter. For an Uno, the AVR core’s boards.txt allows 32 256 bytes of program storage (the rest of the 32 KB is kept for the bootloader that receives your uploads) and 2048 bytes of dynamic memory (SRAM). Global variables are counted at compile time; local variables and the stack use the rest while the program runs.
Arduino’s memory guide gives two simple savings. Text in Serial.print("…") normally takes SRAM; wrapping it as Serial.print(F("…")) keeps the string in flash instead. Large constant tables can go in flash with PROGMEM — at the cost of slower reads. The guide also explains that globals push the heap towards the stack; when they meet, the sketch crashes in strange ways.
| Habit | Why it helps |
|---|---|
| F("…") around every fixed message | Strings live in flash, not SRAM |
| Smallest type that fits (byte, int, unsigned long for time) | Each byte of SRAM counts on an Uno |
| Fixed-size arrays sized for the real need | No surprise growth while the arm moves |
| const for values that never change | Clear intent; the compiler can optimise |
| Check the report after every change | Catch growth early, not when the arm misbehaves |
Visual
Visualise it: lines of code, pins that change
Read the lab like a sketch: the **D7** button is what `digitalWrite(7, HIGH/LOW)` would do, the **A0** slider is the number `analogRead(A0)` would return, and the **D9** duty is `analogWrite(9, value)` with value = duty × 255. Imagine `loop()` checking all three hundreds of times a second. Browser simulation only — nothing is compiled or uploaded, and no real board is touched.
Interactive · GPIO / ADC / PWM Lab
Fake MCU board for digital out, analog in, and PWM duty. Browser-only — never talks to real USB/serial/hardware.
GPIO D7
Good for LEDs / logic — not motors.
ADC A0 (10-bit)
raw 512 → 2.50 V
Pot / distance proxy → robot perception.
PWM D9
duty 40%
PWM → driver → motor — never GPIO-direct.
board@sim ~ pins: D7=0 A0=512 D9=40% · educational MCU only
Code lab
Code lab: simulate a sketch and do the timing and memory maths
1. A sketch on a fake clock
This script runs two Arduino-style sketches on a pretend millis(): one blinks with delay(), the other with the Blink Without Delay pattern. Both check a stop button that is pressed at 1234 ms. Watch how late each one notices.
# sketch_sim.py — run an Arduino-style setup()/loop() on a fake clock to see why delay() is risky.
# Stage 4, Lesson 11. Simulation only: a pretend millis() and a pretend e-stop button. No hardware.

ESTOP_PRESSED_AT = 1234   # ms: someone hits the e-stop at this moment
RUN_FOR = 3000            # ms of simulated time


class Board:
    def __init__(self):
        self.now = 0
        self.led = 0
        self.toggles = []
        self.stopped_at = None

    def millis(self):
        return self.now

    def delay(self, ms):          # blocks: nothing else runs while time passes
        self.now += ms

    def estop_pressed(self):
        return self.now >= ESTOP_PRESSED_AT

    def digital_write_led(self, value):
        if value != self.led:
            self.toggles.append(self.now)
        self.led = value


def blocking_sketch(b):
    # void loop() { if (estop) stop; LED on; delay(1000); LED off; delay(1000); }
    while b.now < RUN_FOR and b.stopped_at is None:
        if b.estop_pressed():
            b.stopped_at = b.now
            break
        b.digital_write_led(1)
        b.delay(1000)
        b.digital_write_led(0)
        b.delay(1000)  # loop() returns here and is called again


def non_blocking_sketch(b):
    # Blink Without Delay: check the time, never wait; e-stop is checked every pass.
    previous, interval, state = 0, 1000, 0
    while b.now < RUN_FOR and b.stopped_at is None:
        if b.estop_pressed():
            b.stopped_at = b.now
            break
        if b.millis() - previous >= interval:
            previous = b.millis()
            state = 1 - state
            b.digital_write_led(state)
        b.now += 1  # one pass of loop() takes about 1 ms in this model


print("1) Same job, two sketches: blink the LED and watch an e-stop pressed at 1234 ms")
print("-" * 72)
for name, sketch in (("delay() version", blocking_sketch), ("millis() version", non_blocking_sketch)):
    b = Board()
    sketch(b)
    late = b.stopped_at - ESTOP_PRESSED_AT
    print(f"  {name:<18} LED changes at {b.toggles} ms")
    print(f"  {'':<18} e-stop noticed at {b.stopped_at} ms -> {late} ms late")

print()
print("2) Worst case reaction time vs how long loop() can block")
print("-" * 72)
for block_ms in (1, 15, 100, 1000, 2000):
    print(f"  loop() blocks up to {block_ms:5d} ms -> e-stop may wait up to {block_ms:5d} ms")
print("  Rule: keep every pass of loop() short; never put long delay() calls next to safety checks.")
Output (run with python3 sketch_sim.py)
1) Same job, two sketches: blink the LED and watch an e-stop pressed at 1234 ms
------------------------------------------------------------------------
  delay() version    LED changes at [0, 1000] ms
                     e-stop noticed at 2000 ms -> 766 ms late
  millis() version   LED changes at [1000] ms
                     e-stop noticed at 1234 ms -> 0 ms late

2) Worst case reaction time vs how long loop() can block
------------------------------------------------------------------------
  loop() blocks up to     1 ms -> e-stop may wait up to     1 ms
  loop() blocks up to    15 ms -> e-stop may wait up to    15 ms
  loop() blocks up to   100 ms -> e-stop may wait up to   100 ms
  loop() blocks up to  1000 ms -> e-stop may wait up to  1000 ms
  loop() blocks up to  2000 ms -> e-stop may wait up to  2000 ms
Rule: keep every pass of loop() short; never put long delay() calls next to safety checks.2. Rollover-safe time and an SRAM budget
This script copies how an Uno stores numbers: it wraps a 32-bit millis() value, compares the subtract-first test with the risky add-then-compare test, shows a time overflowing a 16-bit int, works out SRAM saved by F(), and decodes the real memory report from the screenshot above.
# millis_memory.py — rollover-safe timing with unsigned 32-bit millis(), and an SRAM budget.
# Stage 4, Lesson 11. Simulation only: integer maths that copies how an Arduino stores numbers.

U32 = 2 ** 32


def u32(x):
    return x % U32          # unsigned long on an Uno is 32 bits: it wraps to 0 after 2^32 - 1


print("1) millis() wraps after 2^32 ms")
print("-" * 72)
print(f"  2^32 ms = {U32:,} ms = {U32/1000/3600/24:.1f} days")

print()
print("2) Two ways to ask 'has 1000 ms passed?' when the timer wraps")
print("-" * 72)
start = u32(U32 - 400)                       # we start 400 ms before the wrap
deadline_bad = u32(start + 1000)             # this addition wraps to a small number
for now_offset in (100, 399, 401, 999, 1000, 1200):
    now = u32(start + now_offset)
    good = u32(now - start) >= 1000          # Arduino style: (millis() - start) >= interval
    bad = now >= deadline_bad                # risky: millis() >= start + interval
    print(f"  {now_offset:4d} ms after start: now={now:>10}  subtract-style={str(good):<5}  compare-style={bad}")
print("  Subtraction is right across the wrap; the comparison says 'done' at once, about 900 ms too early.")

print()
print("3) An int is too small for time on an Uno (16-bit signed int)")
print("-" * 72)
for ms in (30_000, 32_767, 32_768, 40_000):
    as_int = ((ms + 2 ** 15) % 2 ** 16) - 2 ** 15
    print(f"  millis() = {ms:6d} stored in an int -> {as_int:6d}")
print("  Store millis() in 'unsigned long', as the Arduino reference says.")

print()
print("4) SRAM budget on an Uno (2048 bytes) — example compile report")
print("-" * 72)
SRAM = 2048
globals_bytes = 1210                     # example: 'Global variables use 1210 bytes'
messages = ["Arm ready", "E-STOP pressed!", "Joint limit hit on elbow", "Battery low"]
literal_bytes = sum(len(m) + 1 for m in messages)   # +1 for the hidden '\0' at the end of each string
print(f"  Globals before F():  {globals_bytes} bytes ({globals_bytes/SRAM*100:.0f}%), left for stack/heap {SRAM-globals_bytes}")
after = globals_bytes - literal_bytes
print(f"  {len(messages)} Serial.print strings = {literal_bytes} bytes; wrapped in F(\"...\") they live in flash")
print(f"  Globals after F():   {after} bytes ({after/SRAM*100:.0f}%), left for stack/heap {SRAM-after}")

print()
print("5) Reading a real IDE report (from the 'Select port' screenshot in this lesson)")
print("-" * 72)
FLASH_MAX, SRAM_MAX = 32256, 2048       # ArduinoCore-avr boards.txt: uno.upload.maximum_size / _data_size
sketch_bytes, global_bytes = 924, 9     # "Sketch uses 924 bytes (2%)", "Global variables use 9 bytes (0%)"
print(f"  Flash: {sketch_bytes} / {FLASH_MAX} = {sketch_bytes/FLASH_MAX*100:.2f}%  (the IDE prints the whole number: {sketch_bytes*100//FLASH_MAX}%)")
print(f"  SRAM:  {global_bytes} / {SRAM_MAX} = {global_bytes/SRAM_MAX*100:.2f}%  (the IDE prints {global_bytes*100//SRAM_MAX}%), {SRAM_MAX-global_bytes} bytes left for local variables")
print(f"  32256 not 32768: {32768-FLASH_MAX} bytes of the Uno's flash are kept for the bootloader")
Output (run with python3 millis_memory.py)
1) millis() wraps after 2^32 ms
------------------------------------------------------------------------
  2^32 ms = 4,294,967,296 ms = 49.7 days

2) Two ways to ask 'has 1000 ms passed?' when the timer wraps
------------------------------------------------------------------------
   100 ms after start: now=4294966996  subtract-style=False  compare-style=True
   399 ms after start: now=4294967295  subtract-style=False  compare-style=True
   401 ms after start: now=         1  subtract-style=False  compare-style=False
   999 ms after start: now=       599  subtract-style=False  compare-style=False
  1000 ms after start: now=       600  subtract-style=True   compare-style=True
  1200 ms after start: now=       800  subtract-style=True   compare-style=True
  Subtraction is right across the wrap; the comparison says 'done' at once, about 900 ms too early.

3) An int is too small for time on an Uno (16-bit signed int)
------------------------------------------------------------------------
  millis() =  30000 stored in an int ->  30000
  millis() =  32767 stored in an int ->  32767
  millis() =  32768 stored in an int -> -32768
  millis() =  40000 stored in an int -> -25536
  Store millis() in 'unsigned long', as the Arduino reference says.

4) SRAM budget on an Uno (2048 bytes) — example compile report
------------------------------------------------------------------------
  Globals before F():  1210 bytes (59%), left for stack/heap 838
  4 Serial.print strings = 63 bytes; wrapped in F("...") they live in flash
  Globals after F():   1147 bytes (56%), left for stack/heap 901

5) Reading a real IDE report (from the 'Select port' screenshot in this lesson)
------------------------------------------------------------------------
  Flash: 924 / 32256 = 2.86%  (the IDE prints the whole number: 2%)
  SRAM:  9 / 2048 = 0.44%  (the IDE prints 0%), 2039 bytes left for local variables
32256 not 32768: 512 bytes of the Uno's flash are kept for the bootloaderReal world
Where Arduino-style firmware runs in the real world
- Robot prototypes: countless arms, rovers and grippers start as Arduino sketches — and the good ones are built from small non-blocking tasks like today’s skeleton.
- Teaching labs and science kits: the same
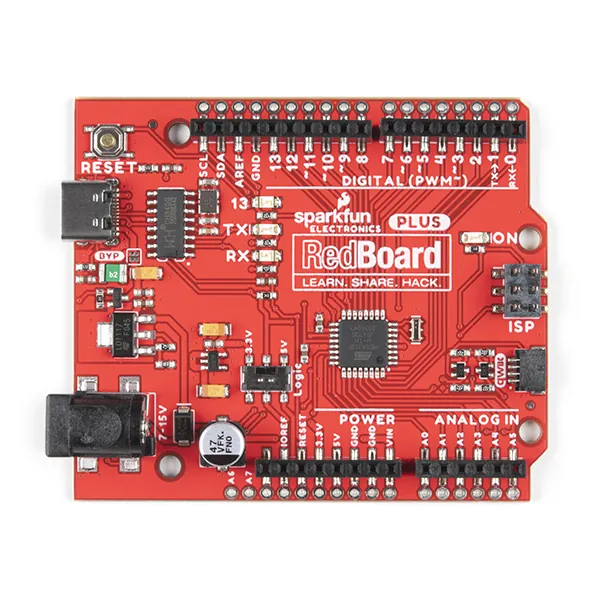
setup()/loop()shape runs on UNO, RedBoard and many compatible boards. - Data loggers: sketches read sensors on a
millis()schedule and print or store the readings. - Interactive art and displays: LEDs, motors and sensors driven from one loop that must stay responsive to visitors.
- Stepping stone to RTOS and ROS: once your tasks are small and non-blocking, moving them to a real-time OS or connecting the board to ROS is a natural next step.
Bench build
Bench build: a joint controller with safety first
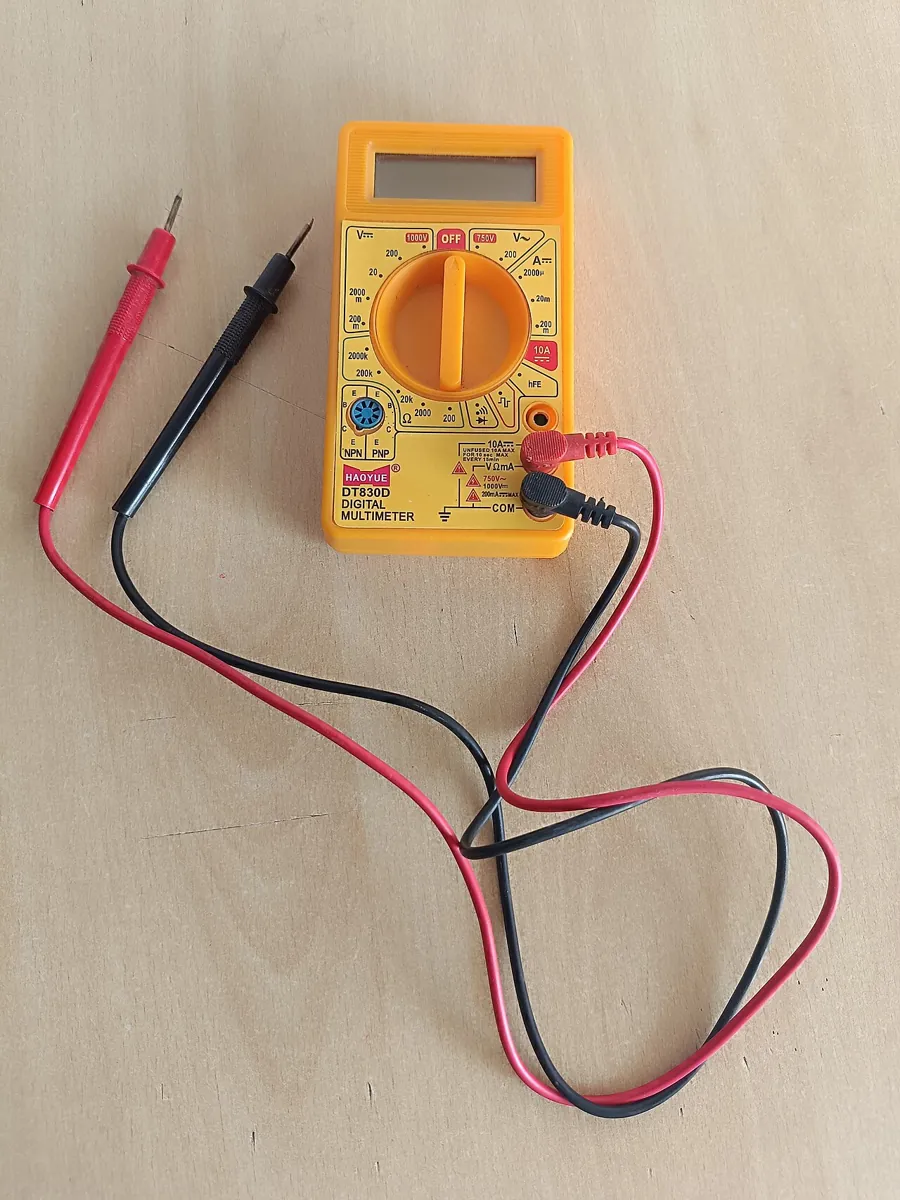
This sketch pulls the whole stage together: a stop button with the internal pull-up (Lesson 7), a knob on the ADC (Lesson 8), a servo with soft limits and gentle motion (Lesson 9), and four non-blocking tasks in one loop(). You need an Uno, a push button, a 10 kΩ pot, one small servo, a separate servo supply with a 100 µF capacitor, jumpers and a multimeter.
Wire power last
Wire the button (pin 2 to GND), the pot (5V, GND, A0) and the servo signal (pin 9) first. Then the servo supply, then the common ground.
Meter check
Supply off: no short across the servo supply. Supply on: the servo rail reads its rated voltage.
Verify, then upload
Read the memory report. Thanks to F(), the messages don’t eat SRAM.
Test the stop
Turn the knob — the servo follows gently between 20° and 160°. Press the button: the pulses stop at once and the LED blinks fast.
Reset to recover
Press the board’s reset button to start again:
setup()runs once more.
// arm_joint_skeleton.ino — a well-structured, non-blocking sketch for one robot joint
// (Stage 4, Lesson 11). For a REAL board on your bench. This sketch is not run inside the browser.
//
// WIRING
//   Stop button: one leg -> pin 2, other leg -> GND (uses the internal pull-up: pressed = LOW)
//   Knob: 10 kOhm pot, outer legs -> 5V and GND, wiper -> A0
//   Servo signal -> pin 9.  Servo RED and BLACK/BROWN -> a SEPARATE 5-6 V supply sized for the
//   servo's stall current, with about 100 uF across it. Supply (-) -> Arduino GND (common ground).
//   NEVER power the servo from an I/O pin or the Arduino 5V pin.
// SAFETY: this software "stop" only stops sending new positions. A real emergency stop must cut
//   the actuator power in hardware. Keep the arm unloaded while you test.

#include <Servo.h>

const int STOP_PIN = 2;
const int KNOB_PIN = A0;
const int SERVO_PIN = 9;
const int LED_PIN = LED_BUILTIN;
const int SAFE_MIN = 20, SAFE_MAX = 160;   // degrees: measure your own joint first

Servo joint;
int angle = 90;
bool stopped = false;
unsigned long tServo = 0, tReport = 0, tBlink = 0;   // unsigned long for millis(), never int

void setup() {
  pinMode(STOP_PIN, INPUT_PULLUP);
  pinMode(LED_PIN, OUTPUT);
  Serial.begin(9600);
  joint.attach(SERVO_PIN);
  joint.write(angle);
  Serial.println(F("Joint ready. Hold the stop button to freeze."));   // F(): text stays in flash
}

void loop() {
  unsigned long now = millis();

  // 1) SAFETY FIRST, every pass: nothing below may block for long.
  if (digitalRead(STOP_PIN) == LOW && !stopped) {
    stopped = true;
    joint.detach();                          // stop sending pulses
    Serial.println(F("STOP pressed - pulses off"));
  }

  // 2) Servo task every 20 ms: read the knob, apply limits, move gently.
  if (!stopped && now - tServo >= 20) {
    tServo = now;
    int target = constrain(map(analogRead(KNOB_PIN), 0, 1023, 0, 180), SAFE_MIN, SAFE_MAX);
    angle += constrain(target - angle, -3, 3);
    joint.write(angle);
  }

  // 3) Report task every 250 ms.
  if (now - tReport >= 250) {
    tReport = now;
    Serial.print(F("angle ")); Serial.print(angle);
    Serial.println(stopped ? F("  [STOPPED]") : F(""));
  }

  // 4) Heartbeat LED: slow blink = running, fast blink = stopped.
  if (now - tBlink >= (stopped ? 100UL : 500UL)) {
    tBlink = now;
    digitalWrite(LED_PIN, !digitalRead(LED_PIN));
  }
}
Debugging
Debugging: when the sketch won’t upload or won’t behave
| Symptom | Likely cause | Fix |
|---|---|---|
| No port in the Tools menu | Charge-only USB cable, loose cable, or missing driver | Try another cable and USB port; check the board’s power LED |
| “Permission denied” on Linux | User not in the serial port’s group (dialout) | Follow the IDE guide: check ls -l /dev/ttyACM*, add your user to the group, log in again |
| Upload fails with something wired to pins 0/1 | Those pins carry the USB serial link on an Uno | Unplug from 0/1 while uploading, or move the wires |
| Garbage characters in the Serial Monitor | Baud rate doesn’t match Serial.begin() | Set both to the same value (9600 in these sketches) |
| Board resets when the servo moves | Servo on the board’s supply (brownout) | Separate servo supply, common ground (Lesson 9) |
| Stop button reacts late | Long delay() in loop() | Use the millis() pattern; check safety first in every pass |
| Timer stops working after about 33 seconds | Time stored in an int | Use unsigned long for all millis() values |
| Strange crashes after adding messages or arrays | SRAM is full | Read the memory report; use F(); shrink arrays |
Think
Think about it
Think
Meera writes `int lastMove = 0;` and `if (millis() - lastMove >= 20) { lastMove = millis(); … }` on her Uno. It works perfectly while she tests it for half a minute, then the servo starts acting strangely. What went wrong, and how would you fix it?
Experiment
Try it in the lab: blocking vs non-blocking
Twenty minutes with the GPIO / ADC / PWM lab, the two Python scripts and your notebook. You will read code as pin actions, measure how blocking code delays safety, and do the memory maths an embedded engineer does every day.
Experiment
Blocking vs non-blocking
You will need
- GPIO / ADC / PWM lab (below, runs in your browser)
- Notebook or a text file
- Optional: your laptop to run `sketch_sim.py` and `millis_memory.py`
Steps
- In the lab, set D7 HIGH, A0 to 700 and D9 to 60%. Write the three Arduino lines that would do the same: `digitalWrite`, `analogRead` (what it returns) and `analogWrite` (what value).
- Write an 8-line `setup()`/`loop()` on paper that reads A0, maps it to 0–255 and writes it to D9 — with `constrain()` after `map()`.
- Run `sketch_sim.py`. Copy how late each version notices the stop button.
- Run `millis_memory.py`. Copy the result of part 2 and explain in one sentence why subtracting first works.
- Using part 5, write the flash and SRAM percentages from the screenshot’s memory report, and how many SRAM bytes are left.
Interactive · GPIO / ADC / PWM Lab
Fake MCU board for digital out, analog in, and PWM duty. Browser-only — never talks to real USB/serial/hardware.
GPIO D7
Good for LEDs / logic — not motors.
ADC A0 (10-bit)
raw 512 → 2.50 V
Pot / distance proxy → robot perception.
PWM D9
duty 40%
PWM → driver → motor — never GPIO-direct.
board@sim ~ pins: D7=0 A0=512 D9=40% · educational MCU only
A sketch sets things up once, then loops — and a good loop is short, never sleeps, checks safety first and runs each task on its own millis() schedule. Small types and F() keep you inside 2 KB of SRAM.
Knowledge check
Check your understanding
Knowledge check
1. When does `setup()` run?
2. What is the difference between Verify and Upload in the Arduino IDE?
3. Why is a long `delay()` dangerous in a robot sketch?
4. Which test is rollover-safe for “has 1000 ms passed since start?”
5. On an Uno, an `int` can hold at most…
6. `map(1023, 0, 1023, 0, 180)` gives 180. What does `map(1100, 0, 1023, 0, 180)` give?
7. What does `Serial.print(F("Arm ready"))` change?
8. Uploads to your Uno keep failing since you wired a Bluetooth module to pins 0 and 1. Why?
9. The Serial Monitor shows random symbols. The most likely cause is…
10. In the skeleton sketch, why is the stop button checked first in every pass of loop()?
Mini assignment
Hands-on assignment
Mini assignment
Firmware for one robot joint
Write, simulate and (if you have the parts) run a clean, non-blocking sketch for one joint of your robot — with safety first, soft limits, readable structure and a memory budget.
Deliverables
- A sketch with a wiring comment block at the top (every pin, the separate actuator supply and the common ground), named constants, and `setup()`/`loop()` split into small timed tasks.
- A short table of your tasks: name, how often it runs (ms), and what it does. The safety check must run every pass.
- Proof there is no blocking: no `delay()` longer than a few milliseconds anywhere in `loop()`.
- The IDE memory report for your sketch (flash and SRAM), before and after using F() for your messages.
- Output of `sketch_sim.py` and `millis_memory.py` with one change of your own, and one sentence on what it shows.
- Half a page in your own words: “firmware must always be listening”.
Do this, step by step
- Copy
arm_joint_skeleton.inointo a new sketch and write a wiring comment block at the top (every pin, separate servo supply, common ground). - Split
loop()into small timed tasks withmillis(); write your task table (name, period ms, job). - Search the sketch for
delay(and remove any long ones. - Compile and note flash and SRAM, then wrap your
Serial.printstrings inF()and compile again. - Run
sketch_sim.pyandmillis_memory.pywith one change of your own and paste outputs.
Stuck? Hints, one at a time
- Hint 1: Pattern:
if (millis() - lastRead >= 20) { lastRead += 20; readSensors(); }— one block per task. - Hint 2: The safety check (e-stop, limits) must run on every pass of
loop(), not on a timer. - Hint 3: On an Uno,
F("text")keeps the string in flash, so the SRAM number in the compile report should drop. - Hint 4: Use
unsigned longformillis()values and subtract (now - last) so the 49-day rollover doesn’t break your timers.
Challenges (pick by level)
- 🟢 Easy: Change Blink so the LED is on for 200 ms and off for 800 ms using
millis(), notdelay(). *Hint:* two intervals, one state variable. - 🟢 Easy: What does
map(512, 0, 1023, 0, 180)return? *Hint:* integer maths cuts fractions. - 🟡 Medium: Add a second joint to
arm_joint_skeleton.inowith its own knob, soft limits and 20 ms task. *Hint:* copy the servo block, new variables. - 🟡 Medium: Make the stop latch until a second “resume” button is held for one full second. *Hint:* remember when the press started with
millis(). - 🟠 Hard-ish: Store the servo’s calibrated min/max pulse in EEPROM so it survives power-off. *Hint:* Arduino’s EEPROM library; write only when values change.
- 🔴 Hard: Accept target angles from the Serial Monitor (for example
90+ Enter) without blockingloop(). *Hint:* read characters as they arrive and act on the newline. - ⚫ Expert: Read the ATmega328P datasheet’s watchdog chapter and the
avr/wdt.hdocumentation, and make the joint stop pulsing ifloop()ever hangs for more than 250 ms. *Hint:* reset the watchdog once per healthy pass.
Next step
Your robot can now think in clean, fast loops. In Lesson 12 — Sensors & Actuators at the Electrical Level you will look at what sits on the other end of those pins: sensors that give voltages, digital signals or bus data, actuators that need power stages and drivers, and the feedback signals that close the loop — and what each needs electrically before a single line of code runs.
Tip: explain today’s chapter with the school day — morning assembly is setup(), the timetable is loop(), and a good teacher never falls asleep in class while the fire alarm might ring.
Look back: Lesson 10: Microcontrollers (MCUs). Next: Lesson 12: Sensors & Actuators at Electrical Level. Related: Stage 3 — VS Code for Robotics and Stage 2 — Python + Robot Control.
Sources
- Arduino reference: setup() and loop() — runs once after power-up or reset; loops consecutively.
- Arduino: Sketches — what a sketch is; comments, variables and functions in Blink.
- Arduino example: Blink and Blink Without Delay — LED_BUILTIN; timing without blocking.
- Arduino reference: delay(), millis() and micros() — blocking drawbacks, unsigned long, ~50-day rollover, 1.024 ms ticks, Timer 0, 4 µs resolution.
- Arduino reference: int — 16-bit on ATmega boards, 32-bit on SAMD/Due.
- Arduino reference: map() and constrain() — integer maths, no constraining.
- Arduino reference: Serial — UART/USART, pins 0 and 1 on Uno, TTL levels vs RS-232, matching baud rate.
- Arduino IDE 2: Uploading a sketch — Verify vs Upload, board and port, Linux dialout permission.
- Arduino Memory Guide and PROGMEM reference — flash/SRAM/EEPROM, heap and stack, F() and PROGMEM.
- Arduino AVR core boards.txt — Uno: 32 256 bytes program storage, 2048 bytes data, 16 MHz, Optiboot bootloader.
- Arduino Servo library documentation — attach(), write(), detach().
- SparkFun Learn: What is an Arduino? — board plus IDE; upload over USB without a separate programmer.
- Photos: Wikimedia Commons (credits under each image).
Self-attested for now — keep artifacts in your lab notebook.
Complete
Today's goal
0 of 1 done today
Mark this lesson complete when you have worked the experiment, knowledge check, and assignment (even roughly).