
Robotics Orientation · Lesson 01
What Is a Robot?
Est. 35–45 min
Why
Why start with “what is a robot”?
Ask ten people what a robot is and you'll get ten answers: a metal humanoid from a film, a factory arm, a robot vacuum, even ChatGPT. Before we build arms and write control code, we need one clear, practical definition we can use in the lab. It will help us decide what parts to buy, what code to write, and where to look when something goes wrong.
By the end of this lesson you will be able to look at any machine (a ceiling fan, a traffic signal, a washing machine, a robot arm) and say how “robot-like” it is, with reasons.
Concept
The big idea: sense → think → act, again and again
Here is the working definition we will use for the whole course:
The three jobs, in plain words
- Sense: a sensor turns something physical (distance, light, angle, water level, temperature) into an electrical signal a computer can read. Your eyes and ears are your sensors.
- Think (compute): a controller is a small computer (like an Arduino) that reads the sensor signals, follows rules or maths, and decides what to do next. Your brain is your controller.
- Act: an actuator is the part that actually moves or changes something: a motor, a servo, a pump, a valve, a buzzer. Your muscles are your actuators.
The secret ingredient: feedback
After the robot acts, it senses again to check what really happened. If the result isn't what it wanted, it corrects. This “check and correct” cycle is called feedback, and a system that uses it is called closed loop.
A system that just follows a fixed plan without checking is open loop. Most traffic signals are a good example: they change on a fixed timer whether the road is jammed or empty. (Some newer signals do use cameras or road sensors to adjust; those are closed loop.)
Robot is a spectrum, not a yes/no
| Machine | Sense | Think | Act | Feedback? | Verdict |
|---|---|---|---|---|---|
| Ceiling fan + regulator | None (you feel the heat) | None (you decide) | Motor | Only through you | Appliance |
| Fixed-timer traffic signal | None | Timer | Lamps | No (open loop) | Automation |
| Float-switch water pump | Float switch | Simple rule | Pump | Yes | Very simple robot-like system |
| Washing machine | Water level, door, drum speed | Program | Valves, motor | Partly | Smart appliance |
| Robot vacuum cleaner | Bump, cliff, wheel sensors | Onboard computer | Wheels, brushes | Yes, constantly | Robot |
| 6DOF robotic arm (Stage 6) | Servo position, later camera | Arduino / PC | Six servos | Yes | Robot |
How it works
How it actually works, step by step
Let’s slow down the float-switch tank and watch one turn of its loop. A robot arm or a robot vacuum does exactly the same thing, just with more sensors and faster maths.
Sense
The float switch inside the tank tilts up or down with the water. Its contact is open or closed, and the controller reads that as a simple ON/OFF signal: “water is low” or “water is high”.
Think
The controller checks its rule: “If low → pump ON. If high → pump OFF. Otherwise → keep doing what you were doing.” That last part stops the pump from clicking on and off every second.
Act
A relay switches the pump motor on or off. Water starts (or stops) flowing up to the tank.
The world changes
The water level rises because of the pump, and falls because someone is bathing or washing utensils.
Sense again (feedback)
Next moment, the float switch reports the new level and the loop repeats, forever. Because it always re-checks, the system copes with surprises like guests arriving and using extra water.

Click each block to see real components that do that job in robots.
Interactive · Robot architecture
Sensors — examples
- •Distance (ultrasonic / ToF)
- •Encoders / pots
- •IMU
- •Camera
- •Bump / limit switches
Visual
Visualise it: a water tank that looks after itself
Switch between a float switch (closed loop) and a plain timer (open loop). Move the sliders and watch the level graph, overflow and dry minutes change.
Interactive · Water tank: float switch vs timer
Overflow wasted
0 L
Minutes dry
0 min
Pump running
74 min
Pump switchings
4
Model: 1000 L tank, starts at 300 L, simulated minute by minute for 3 hours. Float switch = closed loop (it senses the level). Timer = open loop (it never looks at the tank).
Worked example
Worked example: why the timer wastes water
Numbers make the difference between open loop and closed loop very clear. Take a 1000 L tank, a pump that adds 30 L/min, and a house that uses 12 L/min.
Check it yourself in the visualisation above: choose Timer only, set usage 12 L/min, pump 30 L/min and timer 40 min. The “Overflow wasted” box should read 980 L. Now switch to Float switch and watch it drop to 0.
Code lab
Code lab: write your first “robot brain” in Python
You don’t need hardware to understand the loop. This tiny Python program is the tank controller: sense, decide, act, repeat. Copy it into a file called water_tank.py and run it with python3 water_tank.py (any computer with Python 3).
# water_tank.py — a robot in disguise: sense -> decide -> act, every minute.
# Overhead tank with a float switch controlling the pump.

CAPACITY = 1000   # litres
LOW = 250         # float switch: pump ON at or below this level
HIGH = 900        # float switch: pump OFF at or above this level
PUMP_RATE = 30    # litres per minute the pump adds
USAGE = 12        # litres per minute the house uses

level = 300       # starting level in litres
pump_on = False

for minute in range(0, 61):
    # 1. SENSE: read the float switch (here: just look at the level)
    # 2. DECIDE: simple rule with two thresholds (prevents rapid on/off)
    if level <= LOW:
        pump_on = True
    elif level >= HIGH:
        pump_on = False
    # 3. ACT: the pump changes the world
    level += (PUMP_RATE if pump_on else 0) - USAGE
    level = max(0, min(CAPACITY, level))
    if minute % 10 == 0:
        print(f"t={minute:2d} min  level={level:4d} L  pump={'ON ' if pump_on else 'OFF'}")
Expected output
t= 0 min  level= 288 L  pump=OFF
t=10 min  level= 348 L  pump=ON
t=20 min  level= 528 L  pump=ON
t=30 min  level= 708 L  pump=ON
t=40 min  level= 888 L  pump=ON
t=50 min  level= 798 L  pump=OFF
t=60 min  level= 678 L  pump=OFF
Reading the code
- The
for minute in range(0, 61)loop is the robot’s heartbeat: one turn = one minute. - The
if / elifblock is the think step. There is noelse, so in between the two levels the pump keeps its old state. That two-level band is called hysteresis, and it stops the pump from chattering on and off. level += …is the act step changing the world.max(0, min(CAPACITY, level))just keeps the number realistic.
Real world
Robots you have already met
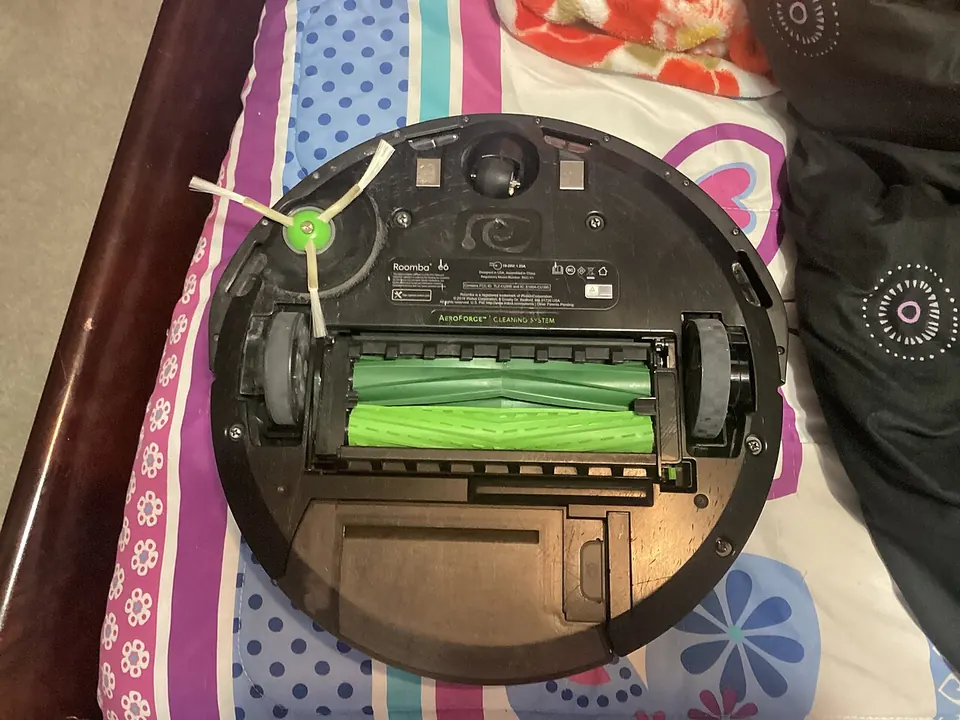
- Robot vacuum cleaners: bump, cliff and wheel sensors → onboard computer → wheels and brushes. A full sense-think-act loop that runs all the time.
- Warehouse robots (AMRs): laser scanners and cameras → navigation software → drive motors. They carry shelves or boxes to packers.
- Industrial robot arms: joint encoders → motion controller → joint motors. Car factories around the world, including in India, use them for welding and painting.
- Your Stage 6 project: a desktop 6DOF arm. Servos with built-in position sensing, an Arduino brain, and six joint actuators.
Mistakes
Common mistakes and confusions
Hardware & safety
Hardware lab and safety notes
You can build a real closed-loop “tank” on the desk with an Arduino Uno, a push button as the float switch and an LED as the pump. No water, no mains, nothing dangerous.
- Button between pin 2 and GND (use
INPUT_PULLUP, so pressed = LOW = “tank low”). - LED + 220 Ω resistor from pin 13 to GND (or just use the built-in LED) = “pump ON”.
- Logic: button pressed → LED ON; button released → LED OFF. That is sense → think → act.
// tank_button.ino — a desk "water tank" robot: button = float switch, LED = pump.
// Wiring (Arduino Uno): push button between pin 2 and GND. Built-in LED on pin 13.
// No pump, no mains: the LED only SHOWS what the pump relay would do.
const int FLOAT_SWITCH = 2;   // pressed = LOW = "tank is low"
const int PUMP_LED = LED_BUILTIN;

bool pumpOn = false;
unsigned long pumpStarted = 0;

void setup() {
  pinMode(FLOAT_SWITCH, INPUT_PULLUP);
  pinMode(PUMP_LED, OUTPUT);
  Serial.begin(9600);
  Serial.println("Tank controller ready");
}

void loop() {
  bool tankLow = (digitalRead(FLOAT_SWITCH) == LOW);   // 1. SENSE

  if (tankLow && !pumpOn) {                             // 2. THINK
    pumpOn = true;
    pumpStarted = millis();
    Serial.println("Tank low  -> pump ON");
  } else if (!tankLow && pumpOn) {
    pumpOn = false;
    Serial.print("Tank full -> pump OFF after ");
    Serial.print((millis() - pumpStarted) / 1000.0, 1);
    Serial.println(" s");
  }

  digitalWrite(PUMP_LED, pumpOn ? HIGH : LOW);          // 3. ACT
  delay(20);                                            // 4. repeat ~50 times a second
}
Example Serial Monitor output at 9600 baud (hold time will differ)
Tank controller ready
Tank low  -> pump ON
Tank full -> pump OFF after 2.4 s
Debugging
Debugging: when it doesn’t work
| Symptom | Likely cause | Fix |
|---|---|---|
| LED never turns on | Button wired to 5 V instead of GND, or INPUT_PULLUP missing | Wire button pin 2 → GND and use pinMode(2, INPUT_PULLUP) |
| LED flickers randomly | Input pin left floating | Use INPUT_PULLUP so the pin has a defined level |
| Python tank never switches off | elif line deleted or OFF level above capacity | Keep OFF level (900 L) below CAPACITY (1000 L) |
| Overflow number differs from 980 L | Sliders not at 12 / 30 / 40 | Reset the visualisation and set the values again |
Think
Think about it
Think
Is a washing machine a robot? Argue both “yes” and “no” using sense, think and act.
Experiment
Try it in the lab: classify machines in your home
Time to use the definition in real life. No hardware needed, just your eyes and a notebook.
Experiment
Classify three machines
You will need
- Notebook and pen (your lab notebook)
- Any three machines at home: fridge, mixer, phone, microwave, ceiling fan, inverter, toy car
Steps
- Pick three machines near you (phone, microwave, printer, toy car, etc.).
- For each, list: sensors (if any), computer, actuators, and whether feedback exists.
- Label each as appliance / tool / robot-ish — and write one sentence why.
- Bonus: open the water-tank visualisation above and find a timer setting that never overflows. Then increase usage by 5 L/min. Does it still work? What does that tell you about open loop?
| Machine | Sense | Think | Act | Feedback | Label |
|---|---|---|---|---|---|
| Fridge | Temperature sensor (thermostat) | Simple controller | Compressor | Yes: switches off when cold enough | Robot-ish appliance |
| Mixer grinder | None | None (you turn the knob) | Motor | No | Tool / appliance |
| Smartphone | Many (touch, camera, GPS…) | Powerful computer | Only vibration motor, speaker, screen | Yes, but it barely moves anything | Computer, not a robot |
Knowledge check
Check your understanding
Knowledge check
1. Which trio best matches the lab’s working definition of a robot?
2. Open-loop automation means…
3. Why does feedback matter in real environments?
4. In the automatic water-tank controller, which part is the SENSOR?
5. A remote-control toy car with no sensors is best described as…
Practice quiz
Mini assignment
Hands-on assignment
Mini assignment
One-paragraph robot definition
Write your own lab definition of a robot in ≤120 words. Include sense, compute, act, and when you would call something “automation” instead.
Deliverables
- Definition paragraph
- One example that fits
- One borderline example with a caveat
Stretch: modify water_tank.py so it prints a warning line whenever the level drops below 100 L. That is your first “alarm” behaviour.
Do this, step by step
- Open
water_tank.pyand changeUSAGEto 20 L/min. Run it and note the minute when the pump first switches OFF. - Now set
USAGEto 35 L/min (more than the 30 L/min pump). Run it again and write down the lowest level the tank reaches. - Write your ≤120-word robot definition using the template below.
- Add one example that fits and one borderline example (with the reason it is borderline).
Stuck? Hints, one at a time
- Hint 1: With 20 L/min usage the tank gains only 30 − 20 = 10 L per minute, so filling takes longer.
- Hint 2: With 35 L/min usage the tank *loses* 5 L/min even with the pump ON — the controller is right, but the actuator is too weak.
- Hint 3: For the borderline example, pick something that senses OR acts but not both in a loop (a smoke alarm, a remote-control car).
Challenges (pick by level)
- 🟢 Easy: Add a line that prints
ALARMwhen the level drops below 100 L. - 🟡 Medium: Make the timer version in Python and print total overflow after 3 hours. Do you get 980 L?
- 🟠 Hard: Build the button + LED “tank” on an Uno and add a second LED that lights while the button is held more than 5 s (“pump running too long”).
Next step
Next, Lesson 2: Anatomy of a Robot gives names to the body parts (base, links, joints, end-effector). Related: control loops in depth come in Stage 7 — Control Systems & PID.
Sources
- Wikipedia — Robot — general definitions and history.
- Wikipedia — Control loop — open loop vs closed loop.
- Wikipedia — Float switch — how tank level switches work.
- Wikipedia — Hysteresis — why ON and OFF levels are different.
- Wikipedia — Roomba — sensors and behaviour of robot vacuums.
- Photos: Wikimedia Commons (credits under each image).
Self-attested for now — keep artifacts in your lab notebook.
Complete
Today's goal
0 of 1 done today
Mark this lesson complete when you have worked the experiment, knowledge check, and assignment (even roughly).