
Computer Vision for Robotics (Vision Foundations) · Lesson 05
Edges, Features & Shapes
Est. 55–70 min
Why
Why this lesson matters
Think of a kirana shopkeeper looking at a delivery: he knows the Parle-G packet, the round Bourbon tin and the triangle samosa box at a glance, even in a dim godown. He is using shape — outline, corners, roundness — not colour. When colour fails or all parts look alike, shape is the next thing a robot should check.
In this lesson you will find edges with Canny (and understand its two thresholds), turn a clean mask into contours with findContours, measure each contour (area, perimeter, centre, corners, roundness, tilt) and name it: square, rectangle, triangle, circle or hexagon. On the bench, the camera’s answer lights a signal LED, like the lamps on a sorting line.
Concept
From edges to contours to shape names
1. What is an edge?
An edge is where brightness changes quickly — the border between a white part and the black mat. The Sobel filter measures this change in x (Gx) and in y (Gy); the edge strength is √(Gx² + Gy²) and its direction is always across the edge. A flat area has strength near 0; a sharp border has a big value.
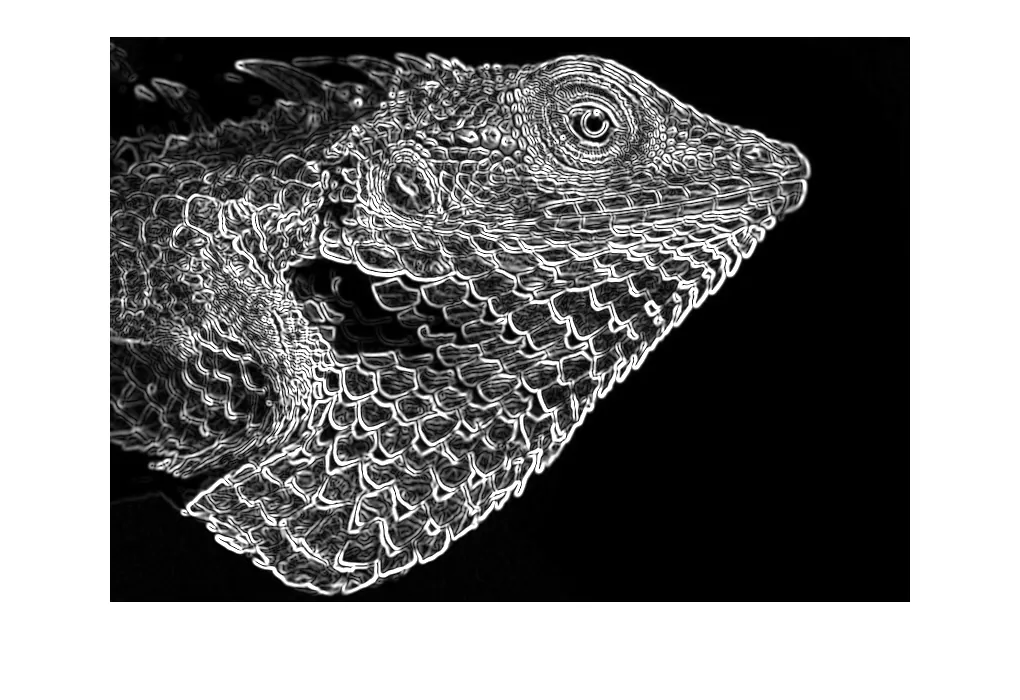
2. Canny in four steps
Noise reduction
A 5 × 5 Gaussian blur first, because edge detection is very sensitive to noise (Lesson 4).
Gradient
Sobel in x and y gives the strength and direction of change at every pixel.
Non-maximum suppression
Along the gradient direction, keep only the pixel that is the local maximum. Result: edges one pixel thin.
Hysteresis (two thresholds)
cv.Canny(img, minVal, maxVal). Above maxVal = sure edge. Below minVal = not an edge. In between = kept only if connected to a sure edge. This keeps long real outlines and drops lonely noise dots.
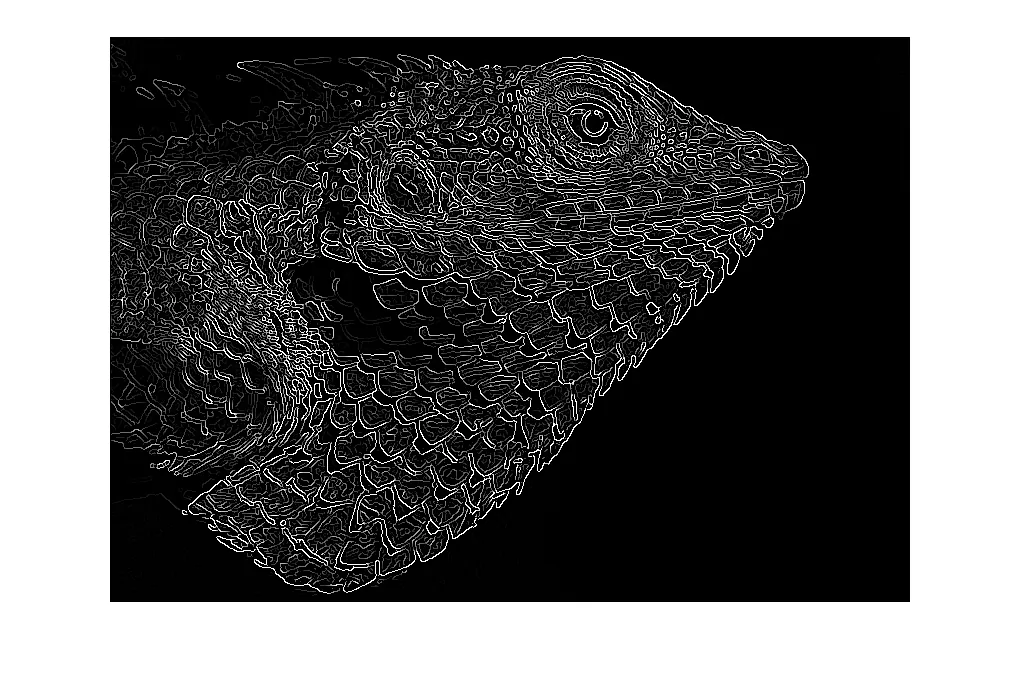
3. Contours: the outline as a list of points
A contour is a curve joining the boundary points of a region with the same intensity. cv.findContours(mask, mode, method) needs a binary image with the object white on black (threshold or Canny first). It returns a Python list; each contour is a NumPy array of (x, y) points.
cv.RETR_EXTERNAL— only outer outlines (ignore holes inside a washer).cv.RETR_TREE— all outlines plus their parent/child relationships.cv.CHAIN_APPROX_NONEstores every boundary point;cv.CHAIN_APPROX_SIMPLEkeeps only end points of straight runs — a rectangle needs just 4.- Draw with
cv.drawContours(img, [c], -1, (0, 255, 0), 2).
4. Measuring a contour
| Measure | OpenCV | Tells you |
|---|---|---|
| Area | cv.contourArea(c) or M["m00"] | size (ignore tiny crumbs) |
| Perimeter | cv.arcLength(c, True) | outline length |
| Centre | M = cv.moments(c); cx = m10/m00, cy = m01/m00 | where to send the gripper |
| Corners | cv.approxPolyDP(c, eps, True); eps ≈ 1–3% of perimeter | 3 = triangle, 4 = box, many = round |
| Roundness | circularity = 4π·area / perimeter² | 1.0 for a perfect circle, lower for corners |
| Tilt and aspect | cv.minAreaRect(c) → centre, (w, h), angle | rotation of the part; long/short side ratio |
| Straight box | cv.boundingRect(c) → x, y, w, h | quick region of interest |
Visual
Visualise it: edge sensitivity and shape cues
Educational edge and shape explorer: change edge sensitivity and overlay simple shape cues. (Browser sim, not OpenCV.)
Interactive · Edge & shape explorer · Educational

Simplified gradient magnitude (Sobel-style). Real systems use Canny, contours, or learned detectors — this canvas is for intuition only, not OpenCV runtime.
Code lab
Code lab: name every part on the mat
shapes_lab.py draws a 320 × 200 dark mat with five white parts — a 50 × 50 square, an 80 × 36 rectangle tilted 30°, a triangle, a circle of radius 32 and a hexagon — and adds sensor noise. It compares Canny with and without blur, finds contours, measures them, names them and shows how epsilon changes the corner count. No camera needed.
"""Stage 11 L05 - Edges, contours and shapes: name every object on the table.

No camera needed. We draw a 320x200 table with five white parts on a dark mat:
a square, a rotated rectangle, a triangle, a circle and a hexagon (+ noise).
Then:  Canny edges  ->  threshold + findContours  ->  measure  ->  name the shape.
Run:  python3 shapes_lab.py      (saves shapes_result.png)
"""
import math

import cv2 as cv
import numpy as np

H, W = 200, 320
rng = np.random.default_rng(3)
img = np.full((H, W), 40, np.uint8)                                   # dark mat

cv.rectangle(img, (20, 30), (69, 79), 220, -1)                        # square 50x50
rect = ((140, 55), (80, 36), 30)                                      # centre, size, angle
cv.fillPoly(img, [cv.boxPoints(rect).astype(np.int32)], 220)          # rotated rectangle
cv.fillPoly(img, [np.array([[230, 85], [290, 85], [260, 30]], np.int32)], 220)   # triangle
cv.circle(img, (60, 145), 32, 220, -1)                                # circle r=32
hexagon = [(160 + 34 * math.cos(math.radians(a)), 150 + 34 * math.sin(math.radians(a)))
           for a in range(0, 360, 60)]
cv.fillPoly(img, [np.array(hexagon, np.int32)], 220)                  # hexagon
noisy = np.clip(img + rng.normal(0, 18, img.shape), 0, 255).astype(np.uint8)

# ---------- 1. Canny edges: raw vs blurred, and the two thresholds ----------------
print('1) Canny edge pixels (more is NOT better - we want thin, real outlines)')
blur = cv.GaussianBlur(noisy, (5, 5), 0)
for name, src in [('raw    ', noisy), ('blurred', blur)]:
    for lo, hi in [(30, 60), (100, 200)]:
        e = cv.Canny(src, lo, hi)
        n, _ = cv.connectedComponents(e)
        print(f'   {name} Canny({lo:3d},{hi:3d}): edge px={np.count_nonzero(e):5d}  pieces={n - 1}')
edges = cv.Canny(blur, 100, 200)

# ---------- 2. Contours from a clean mask -------------------------------------------
_, mask = cv.threshold(blur, 0, 255, cv.THRESH_BINARY + cv.THRESH_OTSU)   # parts are white
mask = cv.morphologyEx(mask, cv.MORPH_OPEN, np.ones((3, 3), np.uint8))
contours, _ = cv.findContours(mask, cv.RETR_EXTERNAL, cv.CHAIN_APPROX_SIMPLE)
contours = [c for c in contours if cv.contourArea(c) > 100]              # ignore crumbs
contours.sort(key=lambda c: (cv.boundingRect(c)[1] // 60, cv.boundingRect(c)[0]))  # rows, then left->right
print(f'\n2) findContours: {len(contours)} parts (after dropping blobs under 100 px)')

full, _ = cv.findContours(mask, cv.RETR_EXTERNAL, cv.CHAIN_APPROX_NONE)
simple_pts = sum(len(c) for c in contours)
none_pts = sum(len(c) for c in full if cv.contourArea(c) > 100)
print(f'   points stored: CHAIN_APPROX_NONE={none_pts}  CHAIN_APPROX_SIMPLE={simple_pts}')


def name_shape(c: np.ndarray):
    area = cv.contourArea(c)
    peri = cv.arcLength(c, True)
    approx = cv.approxPolyDP(c, 0.03 * peri, True)
    v = len(approx)
    circ = 4 * math.pi * area / (peri * peri)          # 1.0 = perfect circle
    (_, _), (rw, rh), ang = cv.minAreaRect(c)
    aspect = max(rw, rh) / max(min(rw, rh), 1)
    # OpenCV's angle convention changed between versions; turn it into
    # "tilt of the LONG side from the x-axis, 0..180 deg, y pointing down".
    tilt = (ang if rw >= rh else ang + 90) % 180
    ang = round(tilt, 1) % 180
    if v == 3:
        label = 'triangle'
    elif v == 4:
        label = 'square' if aspect < 1.15 else 'rectangle'
    elif circ > 0.85 and v > 6:
        label = 'circle'
    elif v in (5, 6):
        label = 'pentagon' if v == 5 else 'hexagon'
    else:
        label = 'unknown'
    return label, area, peri, v, circ, aspect, ang


# ---------- 3. Measure and name -----------------------------------------------------
print('\n3) Measure each contour')
print('   #  name       area   perim  corners circularity aspect  tilt   centre')
out = cv.cvtColor(noisy, cv.COLOR_GRAY2BGR)
for i, c in enumerate(contours, 1):
    label, area, peri, v, circ, aspect, ang = name_shape(c)
    M = cv.moments(c)
    cx, cy = M['m10'] / M['m00'], M['m01'] / M['m00']
    print(f'   {i}  {label:9s} {area:6.0f} {peri:6.1f}   {v:3d}      {circ:5.2f}     {aspect:4.2f}  {ang:5.1f}  ({cx:5.1f},{cy:5.1f})')
    cv.drawContours(out, [c], -1, (0, 255, 0), 2)
    cv.putText(out, label, (int(cx) - 25, int(cy)), cv.FONT_HERSHEY_SIMPLEX, 0.4, (0, 0, 255), 1)
print('   truth: square 50x50 px=2500, rectangle 80x36=2880 drawn at 30 deg, triangle 60x55 = 1650,')
print(f'          circle r=32 -> {math.pi * 32 * 32:.0f}, hexagon side 34 -> {1.5 * math.sqrt(3) * 34 * 34:.0f}')
print('   (contourArea joins the CENTRES of the boundary pixels, so a filled 50x50 px square')
print('    measures 49x49 = 2401 - about one pixel smaller all round. Tilt of a square/circle means little.)')

# ---------- 4. Why epsilon matters ---------------------------------------------------
print('\n4) approxPolyDP epsilon on the circle (fraction of its perimeter)')
circle_c = max(contours, key=lambda c: 4 * math.pi * cv.contourArea(c) / cv.arcLength(c, True) ** 2)
for f in (0.005, 0.01, 0.03, 0.1):
    v = len(cv.approxPolyDP(circle_c, f * cv.arcLength(circle_c, True), True))
    print(f'   epsilon={f:5.3f} x perimeter -> {v:2d} corners')
print('   too small: noise looks like corners; too big: a circle becomes a square.')

cv.imwrite('shapes_result.png', np.hstack([out, cv.cvtColor(edges, cv.COLOR_GRAY2BGR)]))
cv.imwrite('shapes_table.png', noisy)
print('\nSaved shapes_result.png (named contours | Canny edges) and shapes_table.png')
Output (python3 shapes_lab.py, tested with opencv-python 5.0)
1) Canny edge pixels (more is NOT better - we want thin, real outlines)
   raw     Canny( 30, 60): edge px=23208  pieces=1803
   raw     Canny(100,200): edge px=12195  pieces=991
   blurred Canny( 30, 60): edge px=12634  pieces=517
   blurred Canny(100,200): edge px= 1222  pieces=5

2) findContours: 5 parts (after dropping blobs under 100 px)
   points stored: CHAIN_APPROX_NONE=926  CHAIN_APPROX_SIMPLE=458

3) Measure each contour
   #  name       area   perim  corners circularity aspect  tilt   centre
   1  square      2399  193.7     4       0.80     1.00   90.0  ( 44.5, 54.5)
   2  rectangle   2855  244.7     4       0.60     2.20   30.1  (139.5, 54.5)
   3  triangle    1648  191.2     3       0.57     1.07    0.0  (260.0, 66.6)
   4  circle      3115  208.2     8       0.90     1.00   90.0  ( 60.0,145.0)
   5  hexagon     3009  212.5     6       0.84     1.12    0.0  (160.0,149.5)
   truth: square 50x50 px=2500, rectangle 80x36=2880 drawn at 30 deg, triangle 60x55 = 1650,
          circle r=32 -> 3217, hexagon side 34 -> 3003
   (contourArea joins the CENTRES of the boundary pixels, so a filled 50x50 px square
    measures 49x49 = 2401 - about one pixel smaller all round. Tilt of a square/circle means little.)

4) approxPolyDP epsilon on the circle (fraction of its perimeter)
   epsilon=0.005 x perimeter -> 12 corners
   epsilon=0.010 x perimeter -> 12 corners
   epsilon=0.030 x perimeter ->  8 corners
   epsilon=0.100 x perimeter ->  4 corners
   too small: noise looks like corners; too big: a circle becomes a square.

Saved shapes_result.png (named contours | Canny edges) and shapes_table.pngTry it: move edge sensitivity from low to high and watch outlines appear and break up. Tick the shape cues to see rectangle/circle hints. (Educational browser sim.)
Interactive · Edge & shape explorer · Educational
Simplified gradient magnitude (Sobel-style). Real systems use Canny, contours, or learned detectors — this canvas is for intuition only, not OpenCV runtime.
shape_sorter_live.py — your real parts on camera
shape_sorter_live.py runs the same steps live: blur, Otsu, opening, contours and naming. Use light parts on a dark mat (or add --dark for dark parts on a light table). It draws each outline with its name. With --port it sends one letter for the biggest part to the Arduino below. --once prints the list without opening a window.
"""Stage 11 L05 - Live shape sorter: name each part the camera sees.

Pipeline: gray -> GaussianBlur 5 -> Otsu -> open -> findContours -> approxPolyDP.
Webcam : python3 shape_sorter_live.py               (light parts on a dark mat)
Photo  : python3 shape_sorter_live.py --image shapes_table.png --once
Dark parts on a light table? add --dark.
Arduino: add --port /dev/ttyACM0 (or COM3) to send one letter per frame to
         shape_signal.ino:  S square, R rectangle, T triangle, C circle, H hexagon, N nothing.
         Needs:  pip install pyserial
"""
import argparse
import math

import cv2 as cv
import numpy as np

LETTER = {'square': 'S', 'rectangle': 'R', 'triangle': 'T', 'circle': 'C', 'hexagon': 'H'}


def name_shape(c):
    peri = cv.arcLength(c, True)
    v = len(cv.approxPolyDP(c, 0.03 * peri, True))
    circ = 4 * math.pi * cv.contourArea(c) / (peri * peri)
    (_, _), (rw, rh), _ = cv.minAreaRect(c)
    aspect = max(rw, rh) / max(min(rw, rh), 1)
    if v == 3:
        return 'triangle'
    if v == 4:
        return 'square' if aspect < 1.15 else 'rectangle'
    if circ > 0.85 and v > 6:
        return 'circle'
    if v == 6:
        return 'hexagon'
    return 'unknown'


def find_parts(frame, dark: bool, min_area: int):
    gray = cv.cvtColor(frame, cv.COLOR_BGR2GRAY) if frame.ndim == 3 else frame
    blur = cv.GaussianBlur(gray, (5, 5), 0)
    mode = cv.THRESH_BINARY_INV if dark else cv.THRESH_BINARY
    _, mask = cv.threshold(blur, 0, 255, mode + cv.THRESH_OTSU)
    mask = cv.morphologyEx(mask, cv.MORPH_OPEN, np.ones((3, 3), np.uint8))
    cs, _ = cv.findContours(mask, cv.RETR_EXTERNAL, cv.CHAIN_APPROX_SIMPLE)
    parts = []
    for c in cs:
        if cv.contourArea(c) < min_area:
            continue
        M = cv.moments(c)
        parts.append((name_shape(c), (M['m10'] / M['m00'], M['m01'] / M['m00']), c))
    parts.sort(key=lambda p: -cv.contourArea(p[2]))          # biggest first
    return parts, mask


def main() -> None:
    ap = argparse.ArgumentParser()
    ap.add_argument('--image')
    ap.add_argument('--camera', type=int, default=0)
    ap.add_argument('--dark', action='store_true', help='dark parts on a light table')
    ap.add_argument('--min-area', type=int, default=300)
    ap.add_argument('--once', action='store_true')
    ap.add_argument('--port', help='serial port of shape_signal.ino')
    a = ap.parse_args()

    link = None
    if a.port:
        import serial  # pyserial, only needed with --port
        link = serial.Serial(a.port, 115200, timeout=0.1)

    still = cv.imread(a.image) if a.image else None
    if a.image and still is None:
        raise SystemExit(f'could not read {a.image}')
    cap = None if still is not None else cv.VideoCapture(a.camera)
    if cap is not None and not cap.isOpened():
        raise SystemExit('camera not found - try --camera 1 or --image file.png')

    while True:
        frame = still if still is not None else cap.read()[1]
        if frame is None:
            print('camera returned no frame')
            break
        parts, mask = find_parts(frame, a.dark, a.min_area)
        if a.once:
            for name, (cx, cy), c in parts:
                print(f'{name:9s} centre=({cx:5.1f},{cy:5.1f}) area={cv.contourArea(c):6.0f}')
            print(f'{len(parts)} part(s)')
        if link is not None:
            link.write((LETTER.get(parts[0][0], 'N') if parts else 'N').encode())
        if a.once:
            break
        view = frame.copy() if frame.ndim == 3 else cv.cvtColor(frame, cv.COLOR_GRAY2BGR)
        for name, (cx, cy), c in parts:
            cv.drawContours(view, [c], -1, (0, 255, 0), 2)
            cv.putText(view, name, (int(cx) - 30, int(cy)), cv.FONT_HERSHEY_SIMPLEX, 0.5, (0, 0, 255), 2)
        cv.imshow('shapes', view)
        cv.imshow('mask', mask)
        if cv.waitKey(30) & 0xFF in (ord('q'), 27):
            break
    if cap is not None:
        cap.release()
    if link is not None:
        link.close()
    if not a.once:
        cv.destroyAllWindows()


if __name__ == '__main__':
main()python3 shapes_lab.py # also saves shapes_table.png
python3 shape_sorter_live.py --image shapes_table.png --once
# circle centre=( 60.0,145.0) area= 3115
# hexagon centre=(160.0,149.5) area= 3009
# rectangle centre=(139.5, 54.5) area= 2855
# square centre=( 44.5, 54.5) area= 2399
# triangle centre=(260.0, 66.6) area= 1648
# 5 part(s)
python3 shape_sorter_live.py # webcam
python3 shape_sorter_live.py --port /dev/ttyACM0 # + Arduino LEDs (pip install pyserial)Bench build: a shape signal lamp
shape_signal.ino listens for one letter per frame and lights green for box-shaped parts (square/rectangle), yellow for circles and red for triangles, hexagons or anything else. If the camera script stops, a 1-second watchdog switches everything off — a habit you will need when the signal drives a real gate.
| Part | Connection | Note |
|---|---|---|
| Green LED | D5 → 220 Ω → LED → GND | square / rectangle |
| Yellow LED | D6 → 220 Ω → LED → GND | circle |
| Red LED | D7 → 220 Ω → LED → GND | triangle / hexagon / unknown |
| Current | about 10–15 mA per LED (Ohm’s law with 220 Ω) | safe only because of the resistors |
| Sorting gate (later) | servo or solenoid on its OWN supply, grounds joined | never from a GPIO; solenoid via MOSFET/driver with a flyback diode |
// Stage 11 L05 - Shape signal: the camera names a shape, the Arduino shows it.
// shape_sorter_live.py --port ... sends ONE letter per frame for the biggest part:
//   S square  R rectangle  T triangle  C circle  H hexagon  N nothing
// Three LEDs show the class, like the signal lamps on a sorting line.
//
// Wiring (each LED with its OWN 220 ohm resistor, short leg to GND):
//   D5 -> 220R -> green LED   = square / rectangle  ("box-shaped parts")
//   D6 -> 220R -> yellow LED  = circle
//   D7 -> 220R -> red LED     = triangle / hexagon / anything else
// About 10-15 mA per LED - fine for an UNO pin ONLY because of the resistors.
// A real sorting gate (servo or solenoid) must NOT be powered from these pins:
// use its own supply with grounds joined, and a driver/MOSFET for solenoids.
// No serial for 1 s -> all LEDs off (camera script stopped = safe state).

const byte GREEN = 5, YELLOW = 6, RED = 7;
unsigned long lastByte = 0;
char current = 'N';

void show(char c) {
  digitalWrite(GREEN,  (c == 'S' || c == 'R') ? HIGH : LOW);
  digitalWrite(YELLOW, (c == 'C') ? HIGH : LOW);
  digitalWrite(RED,    (c == 'T' || c == 'H') ? HIGH : LOW);
}

void setup() {
  pinMode(GREEN, OUTPUT);
  pinMode(YELLOW, OUTPUT);
  pinMode(RED, OUTPUT);
  Serial.begin(115200);
  show('N');
  Serial.println(F("shape_signal ready: send S R T C H or N"));
}

void loop() {
  while (Serial.available()) {
    char c = Serial.read();
    if (c == 'S' || c == 'R' || c == 'T' || c == 'C' || c == 'H' || c == 'N') {
      lastByte = millis();
      if (c != current) {
        current = c;
        show(c);
        Serial.print(F("shape: "));
        Serial.println(c);
      }
    }
  }
  if (current != 'N' && millis() - lastByte > 1000) {   // watchdog
    current = 'N';
    show('N');
    Serial.println(F("no data for 1 s -> all off"));
  }
}Debugging
| Symptom | Likely cause | Fix |
|---|---|---|
| findContours returns one giant contour | mask inverted (background white) | Objects must be white: use BINARY_INV or --dark for dark parts |
| Hundreds of contours | noise crumbs | Blur, open, and skip contours under a minimum area |
| Square named “unknown” (5–6 corners) | epsilon too small or rough edge | Raise epsilon to 3–4% of perimeter; blur more |
| Circle named “square” | epsilon too big | Lower epsilon and check circularity first |
| Two touching parts become one | no gap in the mask | Space parts apart, or erode before contours |
| Canny outline broken into pieces | thresholds too high | Lower minVal, keep maxVal ≈ 2–3 × minVal |
| Serial port busy | Serial Monitor still open | Close it before running the script |
Real world
Shapes in real machines
- Sorting and counting parts: nuts, washers and brackets look alike in colour but not in outline. Corner count, roundness and size separate them.
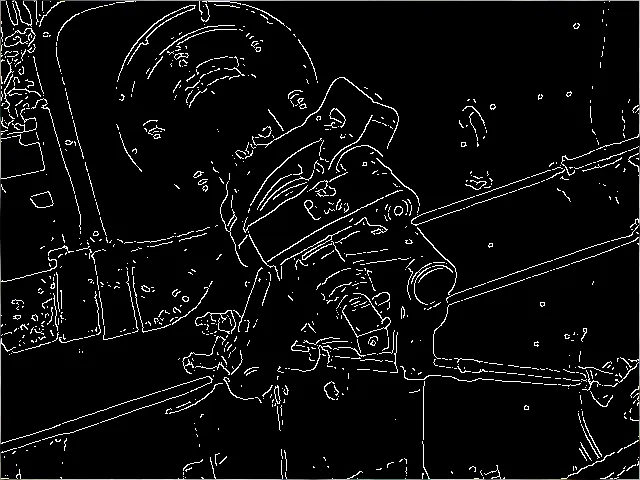
- Reading machines and old mechanisms: an edge map of a real machine part keeps the outline and drops the shading — a cleaner input for measuring it.
- Gripper planning: the centre from moments says *where* to grab; the tilt from
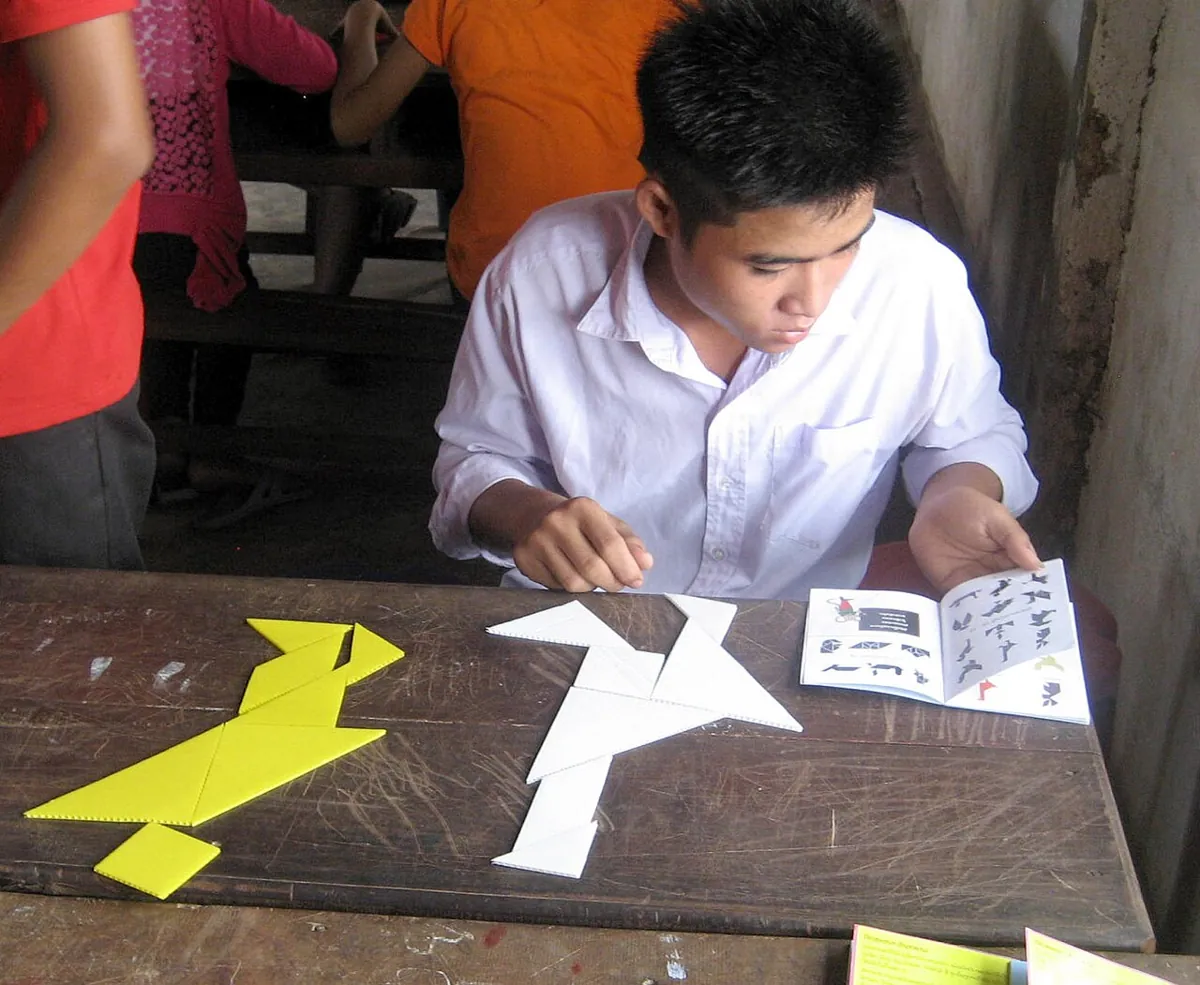
minAreaRectsays *how much to rotate the wrist* before closing on a long bracket. - Education and puzzles: tangram pieces are pure shape — a classic first test set for a shape classifier.
Think
Think about it
Think
A washer (a ring) and a coin of the same outer size lie on the mat. With `RETR_EXTERNAL`, both look like circles. How can you tell them apart?
Experiment
Try it in the lab
About 50 minutes. Python part needs NumPy and OpenCV; camera part needs a webcam, a dark mat and paper or acrylic shapes; bench part needs an Arduino UNO, three LEDs and three 220 Ω resistors.
Experiment
Name the parts on your table
You will need
- `shapes_lab.py`, `shape_sorter_live.py` (opencv-python, numpy; pyserial for `--port`)
- Webcam, black chart paper, cut-out square, rectangle, triangle, circle, hexagon
- Edge & shape explorer (browser)
- Bench: Arduino UNO, green/yellow/red LEDs, 3 × 220 Ω
Steps
- Run `shapes_lab.py`. Raise the noise σ from 18 to 35. Which part is named wrong first?
- Change the epsilon in `name_shape` from 0.03 to 0.01 and 0.06. What changes?
- In the browser explorer, find the sensitivity where outlines are complete but texture is gone.
- Webcam: lay your paper shapes on the black mat. Get all five named correctly.
- Rotate the rectangle by hand and watch the tilt change (add a print of `minAreaRect`).
- Bench: test `shape_signal.ino` with the Serial Monitor, then connect it with `--port`.
Interactive · Edge & shape explorer · Educational
Simplified gradient magnitude (Sobel-style). Real systems use Canny, contours, or learned detectors — this canvas is for intuition only, not OpenCV runtime.
Blur before Canny turns a thousand fragments into one outline per part. Contours give area, centre, corners and tilt. Naming needs two checks together — corners from approxPolyDP and roundness from circularity — and a sensible epsilon.
Knowledge check
Check your understanding
Knowledge check
1. What is the first step inside Canny?
2. In hysteresis, a pixel between minVal and maxVal is kept if…
3. `findContours` expects…
4. Which flag stores only the corner points of straight edges?
5. The centre of a contour from moments is…
6. Circularity 4π·area/perimeter² is close to 1 for…
7. With epsilon = 10% of the perimeter, a circle may be reported as…
8. Why does the Arduino turn all LEDs off after 1 s without data?
Mini assignment
Hands-on assignment
Mini assignment
A shape sorter for the Kota parts box
Build and test a camera shape classifier for five real part shapes, and measure how reliable it is.
Deliverables
- Photos of your five parts on the mat with names drawn by `shape_sorter_live.py`.
- A table for 20 placements (4 per shape, different positions and rotations): true name, predicted name, correct yes/no.
- Your accuracy (% correct) and the settings you used (blur, threshold, epsilon, min area).
- One paragraph on the most common mistake and how you fixed it.
- Optional (bench): a short video of the signal LEDs following the parts.
Do this, step by step
- Run
shapes_lab.pyonce and confirm all five parts are named correctly. - Lay your five paper parts on the black mat and run
shape_sorter_live.pyuntil each name is right. - Do 20 placements (4 per shape, new spot and angle each time) and fill: true name, predicted name, correct yes/no.
- Work out your accuracy (% correct) and write down blur, threshold, epsilon and min area.
- Find your most common mistake, change one setting, and redo the 4 placements of that shape.
Stuck? Hints, one at a time
- Light parts on a dark mat give white contours — use
--darkonly for dark parts on a light table. - Epsilon is a fraction of the perimeter (about 0.03): too small keeps extra corners, too big turns a hexagon into fewer sides.
- A circle and a hexagon can look similar; the code calls it a circle only when circularity (4π·area / perimeter²) is above 0.85.
Challenges (pick by level)
- 🟢 Beginner: Print the bounding box (
cv.boundingRect) for every part and draw it in blue. - 🟡 Intermediate: Add “pentagon” and “star” (hint: a star has convexity defects — compare area with
cv.convexHullarea). - 🟠 Advanced: Detect washers vs coins using
RETR_CCOMPand the hierarchy. - 🔴 Expert: Add Canny-based detection (no threshold) and compare both methods under a side lamp. Which survives uneven light better?
- ⚫ Research: Read about Hu moments (
cv.HuMoments,cv.matchShapes) and build a classifier that recognises your parts by comparing with one saved example of each. Cite sources.
Next step
Shapes work well for simple, flat parts. Real objects — a box with printing, a tool, a book cover — have rich texture. In Lesson 6 — Feature Detection you will find corners and keypoints that let the robot recognise the *same* object even when it is moved, turned or partly hidden.
Sources
- OpenCV 4.x — Canny Edge Detection — 5×5 Gaussian noise reduction, Sobel gradient √(Gx²+Gy²), non-maximum suppression, hysteresis with minVal/maxVal,
cv.Canny(img, 100, 200). - OpenCV 4.x — Contours: Getting Started — definition, white object on black background,
findContours,drawContours, CHAIN_APPROX_NONE vs SIMPLE. - OpenCV 4.x — Contour Features — moments and centroid,
contourArea,arcLength,approxPolyDP(Douglas–Peucker, epsilon), convex hull,boundingRect,minAreaRect. - OpenCV 4.x — Getting Started with Videos —
VideoCaptureloop used by the live sorter. - Photos: Wikimedia Commons (credits under each image).
Look back: Lesson 4: Image Preprocessing. Next: Lesson 6: Feature Detection. Related: Stage 11 — Computer Vision, Stage 13 — Perception, Planning & Manipulation.
Self-attested for now — keep artifacts in your lab notebook.
Complete
Today's goal
0 of 1 done today
Mark this lesson complete when you have worked the experiment, knowledge check, and assignment (even roughly).