
Robotics Orientation · Lesson 04
Actuators
Est. 40–55 min
Why
Why actuators decide what your robot can do
Actuators are the robot’s muscles. Pick one that is too weak and your arm sags or stalls with a buzzing sound. Pick one that is too greedy for current and your Arduino keeps resetting. Most “my robot doesn’t work” stories in Stage 6 trace back to actuator or power choices.
Concept
The big idea: motors turn electricity into motion and force
The main actuator families
| Actuator | How it moves | Good for | Watch out for |
|---|---|---|---|
| DC gear motor | Spins continuously; speed set by voltage / PWM | Wheels, conveyor belts, fans | No position control unless you add an encoder |
| Hobby servo | Turns to a commanded angle (usually ~0–180°) and holds it | Robot arm joints, steering, grippers | Limited torque and range; high current when stalled |
| Stepper motor | Moves in fixed steps (often 200 steps per revolution) | 3D printers, CNC, camera sliders | Can “miss steps” silently if overloaded |
| Linear actuator | Pushes / pulls in a straight line | Lifting, opening hatches | Slow; needs end-stop limits |
Torque: the turning force
Torque is force × distance from the pivot. That’s exactly why the long spanner helps. Hobby servo shops usually quote torque in kg·cm: a 2 kg·cm servo can just hold 2 kg at 1 cm from its shaft, or 200 g at 10 cm. Engineers use newton-metres (N·m): 1 kg·cm ≈ 0.098 N·m.
torque (kg·cm) = mass (kg) × distance from pivot (cm)
- Worst case: the arm is horizontal, so gravity pulls at a right angle
- 1 kg·cm = 0.0980665 N·m
Gears: trading speed for torque
A gearbox with ratio 30:1 makes the output turn 30 times slower but up to 30 times stronger (minus friction losses). Gears also add a little backlash, a small wobble where the teeth don’t quite touch. That’s why a cheap servo horn wiggles slightly when you touch it.
How it works
How a hobby servo actually works, step by step
A hobby servo is a tiny robot in itself: a DC motor, a gearbox, a potentiometer (angle sensor) and a control chip, all in one plastic box. It runs its own closed loop.
You send a pulse
About every 20 ms (50 times a second) the Arduino sends a pulse on the signal wire. The pulse width is the command: roughly 1 ms ≈ one end, 1.5 ms ≈ middle, 2 ms ≈ the other end. The exact range varies between servo models.
The chip reads the angle
A potentiometer on the output shaft tells the servo’s chip where the arm is right now.
It compares
Target (from the pulse) minus actual (from the potentiometer) = error.
It drives the motor
The chip spins the motor towards the target, harder when the error is big.
It holds
At the target the motor stops, but if something pushes the arm, the error comes back and the servo pushes back. That “holding” costs current, all the time.
Visual
Visualise it: can this servo lift that load?
Change the payload, arm length, arm weight and the servo’s rated torque. The status shows whether the servo is comfortable, tight, or overloaded.
Interactive · Servo torque calculator
Torque needed
1.20 kg·cm
Same in SI
0.118 N·m
Servo rating
2.0 kg·cm
Load vs rating
60 %
Worst case is when the arm is horizontal (gravity pulls at 90°). Rule of thumb used by many hobbyists: keep the steady load at or below about half the rated (stall) torque. Rated torque comes from your servo's datasheet.
Worked example
Worked examples: torque and gear ratio
Explore gear ratio: change the ratio and motor speed and watch output speed and torque trade off.
Interactive · Actuator & transmission lab

Integrated motor + gearbox + position loop. Great for early arms; torque limited.
Output speed
~0.7 rpm
Torque gain (ideal)
×150
Teaching model only — real gearboxes have losses, backlash, and current limits. Stage 4 drivers still apply: never GPIO-direct a motor.
Code lab
Code lab: move a servo and check torque
Upload this sketch, open Serial Monitor at 9600 baud, and watch the servo step between 45°, 90° and 135°. Power the servo from a separate 5–6 V supply (see the warning below) and connect that supply’s GND to the Arduino’s GND.
// servo_sweep.ino — move one hobby servo between three angles.
// Wiring: servo signal (orange/yellow) -> pin 9, servo GND (brown/black) -> GND,
// servo + (red) -> a separate 5–6 V supply rated for the servo. Connect supply GND to Arduino GND.

#include <Servo.h>

Servo joint;

void setup() {
  Serial.begin(9600);
  joint.attach(9);          // the library sends a pulse every ~20 ms on pin 9
  joint.write(90);          // start at the middle
  Serial.println("Servo ready at 90 degrees");
  delay(1000);
}

void loop() {
  int angles[] = {45, 90, 135, 90};
  for (int i = 0; i < 4; i++) {
    joint.write(angles[i]);
    Serial.print("Commanded angle: ");
    Serial.print(angles[i]);
    Serial.print("  pulse width: ");
    Serial.print(joint.readMicroseconds());
    Serial.println(" us");
    delay(1000);            // give the servo time to get there
  }
}
Expected Serial Monitor output (pulse widths from the Servo library’s default 544–2400 µs mapping)
Servo ready at 90 degrees
Commanded angle: 45  pulse width: 1008 us
Commanded angle: 90  pulse width: 1472 us
Commanded angle: 135  pulse width: 1936 us
Commanded angle: 90  pulse width: 1472 us
… (repeats)
Before you buy a servo, check the torque on paper. Run this on any computer:
# torque_check.py — can this servo hold this load? (arm horizontal = worst case)
G = 9.80665  # m/s²

def torque_kgcm(load_g, length_cm, arm_g=0):
    # load at the tip + arm's own weight acting at its middle
    return (load_g / 1000) * length_cm + (arm_g / 1000) * (length_cm / 2)

def kgcm_to_nm(kgcm):
    return kgcm * G / 100

cases = [
    ("pen holder", 20, 8, 10),
    ("phone (180 g)", 180, 10, 40),
    ("water bottle (500 g)", 500, 15, 60),
]
RATED = 1.8   # kg·cm — e.g. the stall torque printed in a common SG90 micro-servo datasheet

for name, load, length, arm in cases:
    t = torque_kgcm(load, length, arm)
    pct = t / RATED * 100
    verdict = "OK" if pct <= 50 else ("TIGHT" if pct <= 100 else "STALL")
    print(f"{name:22s} needs {t:5.2f} kg·cm = {kgcm_to_nm(t):.3f} N·m -> {pct:4.0f}% of 1.8 kg·cm: {verdict}")
Expected output
pen holder             needs  0.20 kg·cm = 0.020 N·m ->   11% of 1.8 kg·cm: OK
phone (180 g)          needs  2.00 kg·cm = 0.196 N·m ->  111% of 1.8 kg·cm: STALL
water bottle (500 g)   needs  7.95 kg·cm = 0.780 N·m ->  442% of 1.8 kg·cm: STALL
Real world
Real actuators on the bench
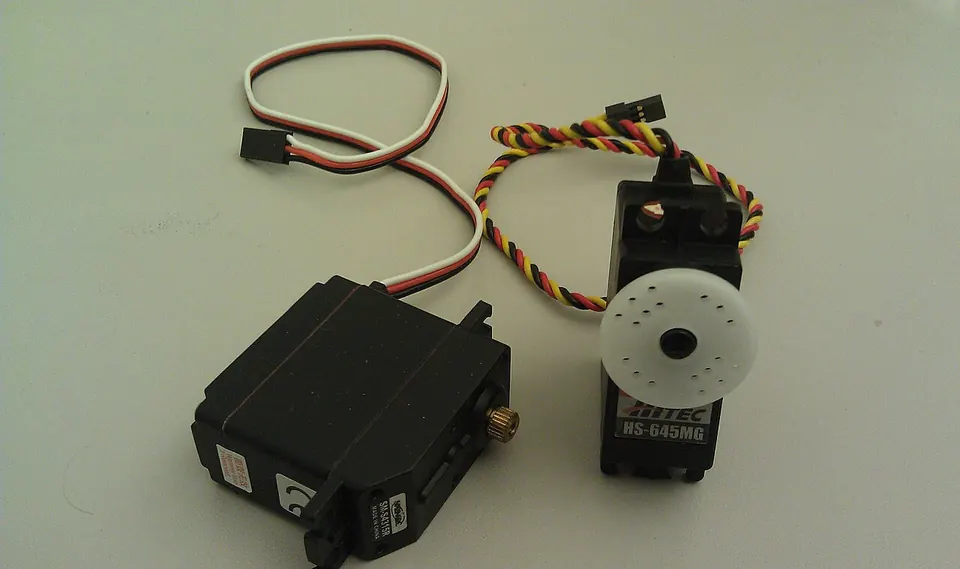
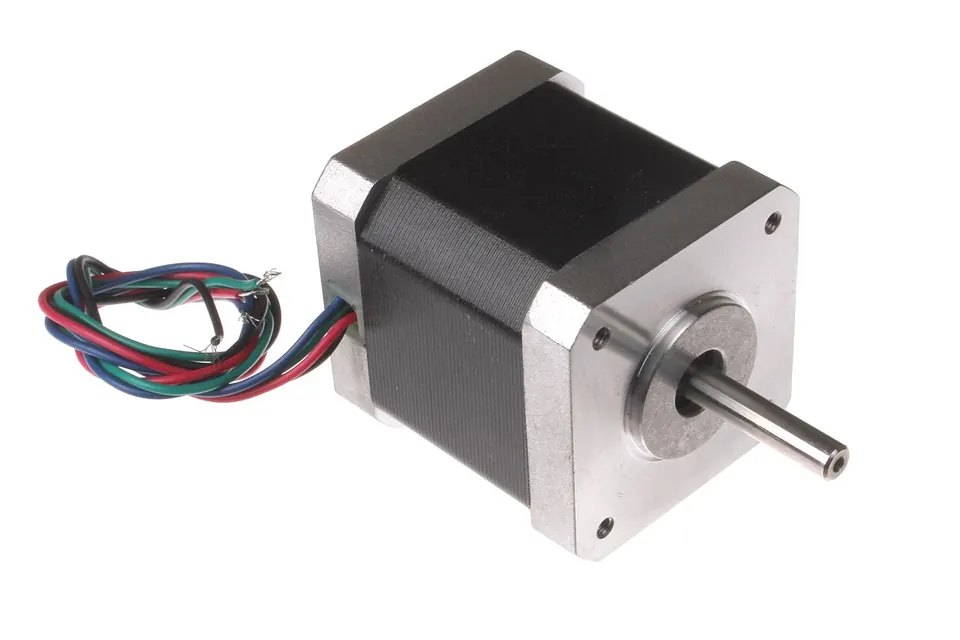
- Desktop arms (Stage 6): metal-gear hobby servos on a shared high-current 5–6 V supply.
- Mobile robots: geared DC motors with wheel encoders so the robot knows how far it has rolled.
- 3D printers and CNC machines: stepper motors with belts or lead screws.
- Industrial arms: powerful servo motors with drives, brakes and safety-rated torque limits.
Mistakes
Common mistakes and debugging
Hardware & safety
Hardware lab and safety notes
Run servo_sweep.ino with one micro servo (SG90 or similar).
- Servo signal (orange/yellow) → pin 9.
- Servo + (red) → separate 5–6 V supply (4×AA pack or a 5 V 2 A adapter), servo – (brown/black) → supply –.
- Join supply – to Arduino GND (common ground) so the signal has a reference.
Debugging
Debugging: when it doesn’t work
| Symptom | Likely cause | Fix |
|---|---|---|
| Servo twitches, Arduino resets | Servo powered from the Uno 5V pin; voltage dips | Use a separate servo supply, join grounds |
| Servo does nothing | No common ground, or signal on the wrong pin | Join supply – to GND; check attach(9) |
| Servo buzzes and gets warm at the end | Commanded past its mechanical stop | Use 10°–170° instead of 0°–180° |
| Servo can’t lift the load | Torque needed > rating | Shorten the arm, lighten the load, or use a stronger servo |
Think
Think about it
Think
Why can six hobby servos brown out a USB-powered Arduino even if “5 V” is printed on the board?
Experiment
Try it in the lab: match the actuator to the job
Choose the right muscle for each job, then prove it with numbers.
Experiment
Actuator match
You will need
- Notebook
- The torque visualisation above
- Optional hardware: Arduino Uno, one micro servo, a separate 5 V supply (e.g. 4×AA pack), jumper wires
Steps
- For each task — spin a wheel continuously, hold a joint angle, lift a camera 20 cm — pick an actuator class.
- Write the main risk (heat, backlash, brownout, missed steps).
- In the torque visualisation, set the rating to 1.8 kg·cm and find the heaviest payload a 10 cm arm can hold comfortably (≤ 50 %).
- With hardware: run servo_sweep.ino and gently hang a small bag of coins on the horn. Note when the servo starts to struggle.
Knowledge check
Check your understanding
Knowledge check
1. Hobby servos typically provide…
2. A gearbox usually…
3. Why separate logic ground carefully with a common ground to the motor PSU?
4. A 200 g load sits 10 cm from a servo shaft (arm weight ignored). What torque is needed?
5. With the Arduino Servo library defaults, roughly what pulse width does write(90) produce?
Practice quiz
Mini assignment
Hands-on assignment
Mini assignment
Current budget sketch
Assume 6 servos that may stall at 1 A each at 6 V. Estimate worst-case current and say why a 2 A phone charger is a bad plan.
Deliverables
- Rough watt/amp estimate
- One safer PSU constraint
Stretch (code): edit servo_sweep.ino so the servo moves from 45° to 135° in 1° steps with delay(15) between steps. Compare the smoothness with the big jumps. (This is a preview of trajectory planning, Stage 9.)
Do this, step by step
- Wire one servo with its own supply and upload
servo_sweep.ino. - Tape a 10 cm stick to the horn. Hang a 20 g weight (e.g. a few coins in a bag) at the end and watch it move.
- Use
torque_check.pyto compute the torque for 20 g at 10 cm and the percentage of your servo’s rating. - Do the current budget: 6 servos that may stall at 1 A each at 6 V. Write the worst-case amps and watts, and why a 2 A phone charger is a bad plan.
Stuck? Hints, one at a time
- Hint 1: Torque (kg·cm) = mass (kg) × distance (cm). 20 g = 0.02 kg.
- Hint 2: Look up your servo’s stall torque on its product page (SG90 is usually listed around 1.8 kg·cm at 4.8 V).
- Hint 3: 6 servos × 1 A = 6 A. A 2 A charger will sag in voltage and the Arduino may reset.
Challenges (pick by level)
- 🟢 Easy: Change the angles list to sweep 60° → 120° → 60°.
- 🟡 Medium: Move from 45° to 135° in 1° steps with
delay(15). Compare smoothness with big jumps. - 🟠 Hard: Find the heaviest payload your servo can hold at 10 cm while staying at ≤50 % of its rating.
Next step
Next, Lesson 5: The Robot Brain — which computer runs the loop. Related: motor drivers in Stage 4 — Electronics, torque and gearboxes in Stage 5 — Robotics Fundamentals, smooth motion in Stage 9 — Trajectory Planning.
Sources
- Arduino — Servo library — attach(), write(), default pulse range.
- Arduino Servo library (GitHub) — source code for the library.
- Wikipedia — Servo (radio control)) — hobby servo pulse control.
- Wikipedia — Stepper motor — how steppers move in steps.
- Arduino — UNO R3 docs — board limits and USB fuse.
- Photos: Wikimedia Commons (credits under each image).
Self-attested for now — keep artifacts in your lab notebook.
Complete
Today's goal
0 of 1 done today
Mark this lesson complete when you have worked the experiment, knowledge check, and assignment (even roughly).