
Robotics Orientation · Lesson 06
Power & Communication
Est. 45–60 min
Why
Why power and wiring cause most “mysterious” failures
Ask anyone who has built robots: most “my robot is possessed” problems are power or wiring, not algorithms. This lesson gives you the few electrical ideas you need, plus how the robot’s parts talk to each other over wires.
Concept
The big idea: volts, amps, a shared ground, and wires that carry messages
Electricity with a water-tank picture
| Quantity | Unit | Water analogy | Robot example |
|---|---|---|---|
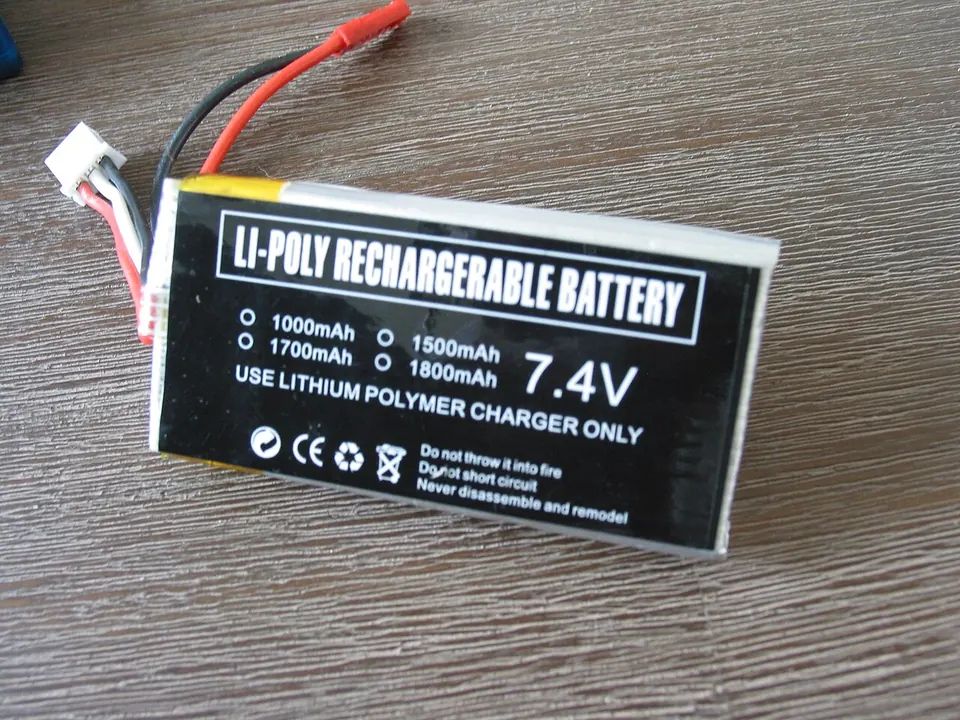
| Voltage (V) | volt, V | Water pressure (how high the tank is) | Arduino logic 5 V; servos often 5–6 V; 2S LiPo 7.4 V |
| Current (I) | ampere, A (1 A = 1000 mA) | Flow rate (litres per minute) | A micro servo moving: a few hundred mA; stalled: much more |
| Power (P) | watt, W | How much work the water does | P = V × I. 6 V × 3 A = 18 W |
| Capacity | mAh or Ah | How much water is stored in the tank | A 2200 mAh battery can give 2.2 A for about 1 hour (in theory) |
Four power rules for every build
- Budget for the peak, not the average. Motors starting or stalling draw much more than when cruising. Your supply must survive the worst moment.
- Separate “logic” and “muscle” power. The Arduino and sensors (logic) need clean, steady 5 V; servos and motors (muscle) need lots of current. Give the muscles their own supply.
- Common ground. When two parts exchange signals, connect their GND wires together. A signal is a voltage measured relative to ground; without a shared ground, “5 V” means nothing.
- Thick enough wires, and a fuse. Thin jumper wires get hot and drop voltage at high current. A fuse turns a short-circuit into a blown fuse instead of a fire.
How parts talk: communication links
| Link | Wires | Typical use | Everyday analogy |
|---|---|---|---|
| UART serial (over USB) | TX, RX, GND | Laptop ↔ Arduino commands and debug prints | A phone call: two people, both can talk |
| I²C | SDA, SCL, GND (+ power) | Many small chips on one bus: IMU, display, PCA9685 servo driver | A class register: the teacher calls each address and only that student replies |
| SPI | MOSI, MISO, SCK, CS per device | Fast devices: SD cards, some displays | A dedicated intercom line to each room |
| CAN | Two twisted wires | Cars, industrial and larger mobile robots | A noisy-road-proof walkie-talkie network |
How it works
How it actually works: one byte travelling over serial
When your laptop sends the letter “O” to the Arduino at 115200 baud, this is what happens on the wire:
Idle
The TX line sits HIGH when nothing is being sent.
Start bit
The line drops LOW for one bit-time: “attention, a byte is coming”.
8 data bits
The 8 bits of the character are sent one after another (least significant bit first).
Stop bit
The line goes HIGH again for one bit-time. Total: 10 bits per character.
Both sides must agree on speed
Baud = bits per second. At 115200 baud one bit lasts about 8.7 µs. If the Arduino uses 115200 and the Serial Monitor is set to 9600, you see garbage characters.
time per character = 10 bits ÷ baud rate
- 9600 baud → 1.04 ms per character
- 115200 baud → 0.087 ms per character
Visual
Visualise it: will your power supply survive?
Change the number of servos, their moving and stall currents, how many might stall together, your supply rating and battery size. Watch headroom and runtime.
Interactive · Power budget & battery runtime
Worst-case current
4.55 A
Headroom
-1.55 A
Average current
1.05 A
Battery runtime
1.7 h
Worst case = servos that stall at the same time × stall current + the rest × moving current + logic. Runtime uses 80 % of the battery's rated capacity and treats idle servo current as ~0 — a rough planning number, not a guarantee. Use your own datasheet / multimeter values.
Worked example
Worked examples: current budget and battery runtime
Code lab
Code lab: budget the power, then talk over serial
First, the budget maths as a reusable script (matches the worked example):
# power_budget.py — worst-case current and battery runtime for a 6-servo arm.
servos = 6
moving_a = 0.5     # A per servo while moving (measure or read datasheet)
stall_a = 1.2      # A per servo when blocked/stalled
stalling = 2       # how many could stall at once (e.g. gripper squeezing + shoulder lifting)
logic_a = 0.15     # Arduino + sensors

worst = stalling * stall_a + (servos - stalling) * moving_a + logic_a
print(f"Worst case current : {worst:.2f} A")

for supply in (2.0, 3.0, 5.0):
    headroom = supply - worst
    status = "OK" if worst <= 0.8 * supply else ("RISKY" if worst <= supply else "BROWNOUT")
    print(f"  {supply:.0f} A supply -> headroom {headroom:+.2f} A  {status}")

# Battery runtime (rough): use 80% of rated capacity
capacity_mah = 2200
duty = 0.30          # servos moving 30% of the time
avg = servos * moving_a * duty + logic_a
hours = (capacity_mah / 1000 * 0.8) / avg
print(f"Average current    : {avg:.2f} A")
print(f"Runtime on {capacity_mah} mAh : about {hours:.1f} h ({hours * 60:.0f} min)")
Expected output
Worst case current : 4.55 A
  2 A supply -> headroom -2.55 A  BROWNOUT
  3 A supply -> headroom -1.55 A  BROWNOUT
  5 A supply -> headroom +0.45 A  RISKY
Average current    : 1.05 A
Runtime on 2200 mAh : about 1.7 h (101 min)
Serial commands: laptop → Arduino
Upload this to an Uno. Open Serial Monitor, set 115200 baud and line ending Newline, then type PING, ON, OFF.
// serial_commands.ino — talk to the robot over USB serial.
// Open Serial Monitor at 115200 baud, line ending "Newline", and type: ON, OFF or PING
const int LED = LED_BUILTIN;

void setup() {
  pinMode(LED, OUTPUT);
  Serial.begin(115200);
  Serial.println("READY");
}

void loop() {
  if (Serial.available() > 0) {
    String cmd = Serial.readStringUntil('\n');
    cmd.trim();                       // remove spaces and \r
    if (cmd == "ON") {
      digitalWrite(LED, HIGH);
      Serial.println("OK LED=ON");
    } else if (cmd == "OFF") {
      digitalWrite(LED, LOW);
      Serial.println("OK LED=OFF");
    } else if (cmd == "PING") {
      Serial.print("PONG uptime_ms=");
      Serial.println(millis());
    } else if (cmd.length() > 0) {
      Serial.print("ERR unknown command: ");
      Serial.println(cmd);
    }
  }
}
Example Serial Monitor session (after typing PING, ON, OFF, DANCE; your uptime number will differ)
READY
PONG uptime_ms=8312
OK LED=ON
OK LED=OFF
ERR unknown command: DANCE
Find which port the board is on (Linux shown; on Windows check Device Manager → Ports, on macOS run ls /dev/cu.*):
# Linux: which serial port did the Arduino get? (plug it in first)
ls /dev/ttyACM* /dev/ttyUSB* 2>/dev/null

# Allow your user to open serial ports without sudo (log out and back in afterwards)
sudo usermod -aG dialout $USER

# pyserial can list ports too (after: python3 -m pip install pyserial)
python3 -m serial.tools.list_ports
Example output with one Uno plugged in (many clone boards show /dev/ttyUSB0 instead)
/dev/ttyACM0
/dev/ttyACM0
1 ports found
Now let Python do the typing. This is the same pattern a Raspberry Pi or a ROS 2 node uses to command a microcontroller:
# serial_client.py — send commands to the Arduino from your laptop / Raspberry Pi.
# Install once:  python3 -m pip install pyserial
# Change PORT to yours: Linux "/dev/ttyACM0", Windows "COM3", macOS "/dev/cu.usbmodem…"
import time
import serial

PORT = "/dev/ttyACM0"

with serial.Serial(PORT, 115200, timeout=1) as arduino:
    time.sleep(2)                      # opening the port resets an Uno; wait for it to boot
    print("Arduino says:", arduino.readline().decode().strip())
    for cmd in ["PING", "ON", "OFF", "DANCE"]:
        arduino.write((cmd + "\n").encode())
        reply = arduino.readline().decode().strip()
        print(f"sent {cmd:5s} -> {reply}")
Example output with the Uno connected (uptime will differ, around 2000 ms because of the 2 s wait)
Arduino says: READY
sent PING  -> PONG uptime_ms=2012
sent ON    -> OK LED=ON
sent OFF   -> OK LED=OFF
sent DANCE -> ERR unknown command: DANCE
Real world
Real power and communication in robots
- Stage 6 desktop arm: a 5–6 V high-current adapter feeds the servo rail; USB from the laptop powers the Arduino and carries serial commands; grounds are joined.
- Mobile robots: battery → fuse → main switch → regulators for 5 V logic, with motors on the battery side. Many add an emergency-stop switch that cuts motor power.
- Servo driver boards such as those based on the PCA9685 chip let one I²C bus (2 signal wires) control up to 16 servos, while the servos get power from their own terminal.
Mistakes
Common mistakes and debugging
Hardware & safety
Hardware lab and safety notes
Talk to your Uno over USB with serial_commands.ino and serial_client.py.
- Only USB is needed; the built-in LED shows ON/OFF.
- Serial Monitor at 115200 baud, line ending Newline.
- Close Serial Monitor before running
serial_client.py— only one program can open the port.
Debugging
Debugging: when it doesn’t work
| Symptom | Likely cause | Fix |
|---|---|---|
| “Permission denied” / port busy | Serial Monitor still open, or (Linux) user not in dialout | Close other programs; sudo usermod -aG dialout $USER then log out and in |
| Python gets empty replies | Board resets when the port opens | Keep the time.sleep(2) after opening |
| “ERR unknown command: ON” | Hidden \r from Windows line endings | Keep cmd.trim(); set line ending to Newline |
| Robot resets when servos move | Supply too weak / shared with logic | Separate servo supply, ≥20 % headroom |
Think
Think about it
Think
Serial data looks corrupt only when motors run. What should you inspect first?
Experiment
Try it in the lab: draw a power map
Experiment
Power map
You will need
- Notebook and coloured pens
- The power-budget visualisation above
- Optional: multimeter, the Stage 6 parts list
Steps
- On paper, draw a 5 V logic rail and a 6 V servo rail with common ground.
- Mark where an ammeter would measure servo current.
- List one fault that would reboot the MCU but not kill servo LEDs (or vice versa).
- In the power-budget lab, start from the defaults and find the smallest supply rating that shows “Supply has headroom”. Then set “servos stalling at the same time” to 6. What size supply would you need now?
Knowledge check
Check your understanding
Knowledge check
1. Logic and servo supplies should usually…
2. UART/serial is often used to…
3. Peak current matters because…
4. A 2000 mAh battery powers a robot that draws 0.8 A on average. Using 80 % of capacity, roughly how long will it run?
5. Serial Monitor shows random symbols like “⸮⸮⸮”. Most likely cause?
Practice quiz
Mini assignment
Hands-on assignment
Mini assignment
Cable discipline checklist
Write a 5-item checklist you will follow before first power-up of any motorized build (polarity, current limit, ground, strain relief, clear workspace).
Deliverables
- Checklist of 5 items
Stretch (code): add a BLINK n command to serial_commands.ino that blinks the LED n times and replies OK BLINK n. Hint: cmd.startsWith("BLINK ") and cmd.substring(6).toInt().
Do this, step by step
- Upload
serial_commands.ino; type PING, ON, OFF and one wrong word in Serial Monitor. Copy the replies. - Install pyserial and run
serial_client.py(change PORT). Copy the output. - Run
power_budget.pywith your own robot’s parts list and note the headroom. - Write your 5-item cable discipline checklist as yes/no checks.
Stuck? Hints, one at a time
- Hint 1:
find_serial_port.shlists the ports; on Linux it is usually/dev/ttyACM0. - Hint 2: If Python prints nothing, the Arduino is probably still booting — wait 2 s after opening.
- Hint 3: Checklist ideas: polarity, current limit/fuse, common ground, strain relief, clear workspace and a quick way to cut power.
Challenges (pick by level)
- 🟢 Easy: Add a
STATUScommand that replies with the LED state. - 🟡 Medium: Add
BLINK nthat blinks n times and repliesOK BLINK n. - 🟠 Hard: In
power_budget.py, setstalling = 6(every servo blocked) and add supplies to the loop until one shows OK. What is the smallest whole-amp supply that passes the 80 % rule?
Next step
Next, Lesson 7: Feedback & Control. Related: power electronics and serial buses in Stage 4 — Electronics, robot messaging in Stage 10 — ROS 2.
Sources
- Arduino — Serial.begin() — baud rates and serial setup.
- pySerial documentation — opening ports and reading lines in Python.
- Arduino — UNO R3 docs — power pins and USB fuse.
- Wikipedia — Lithium polymer battery — cell voltage and safety.
- Wikipedia — Brownout) — why voltage dips reset electronics.
- Wikipedia — Ohm’s law — V = I × R.
- Photos: Wikimedia Commons (credits under each image).
Self-attested for now — keep artifacts in your lab notebook.
Complete
Today's goal
0 of 1 done today
Mark this lesson complete when you have worked the experiment, knowledge check, and assignment (even roughly).