
Robotics Orientation · Lesson 10
Your Robotics Journey
Est. 40–50 min
Why
Why you need a plan, not just enthusiasm
Orientation ends with a map: how Stage 0 connects to the Master Roadmap, how long the next stages might take at your pace, and the lab habits (notebook, tools, safety) you will carry into every stage.
Concept
The big idea: the roadmap as a map
| Stages | What you learn | Status |
|---|---|---|
| 0 | Orientation: shared vocabulary and lab habits (you are here) | Live |
| 1–5 | Maths, Python, Linux, electronics, robotics fundamentals | Live |
| 6 | 6DOF Robotic Arm: the flagship hands-on build | Live |
| 7–9 | Control & PID, kinematics & IK, trajectory planning | Live |
| 10–14 | ROS 2, computer vision, simulation, perception & planning, advanced robotics / RL | Live |
| 15–19 | MoveIt, NVIDIA Isaac, Physical AI, capstone, URDF & TF2 | Planned (no lesson pages yet) |
Two honest ways to move forward
- Recommended path: Stages 1 → 5 in order, then the Stage 6 arm build. Each stage builds on the one before.
- Fast-track to hardware: jump to Stage 6 early if you have the parts and want to build, and learn Stages 1–5 alongside it. This works if you accept that some steps will make full sense only later.
Whichever path you choose, the safety habits from Lessons 6 and 7 (power budget, joint limits, a hand near the power switch) are not optional.
How to study
How to study each lesson, the lab way
Read the story and concept
Get the picture before the details. Don’t worry if the maths isn’t perfect yet.
Play with the visualisation
Move every slider to an extreme. Predict first, then check.
Run the code yourself
Type it (don’t only copy), run it, then change one number and predict the new output.
Do the experiment
Write your numbers in your notebook, including the ones that surprised you.
Knowledge check and assignment
If you get a question wrong, re-read that section. The assignment is where learning sticks.
Mark complete
Use the “Mark lesson complete” button so your progress page stays honest.
Visual
Visualise it: plan your weeks
Pick your weekly study hours and how far you want to plan. Totals use the effort estimates of the live roadmap stages.
Interactive · Study plan planner
Total study time
45–70 h
Calendar time
8–12 weeks
Stages included
7
| Stage | Effort | Done by week |
|---|---|---|
| 00 · Robotics Orientation | 7–9 h | ≤ 2 |
| 01 · Math for Robotics | 4–7 h | ≤ 3 |
| 02 · Programming & Python | 5–8 h | ≤ 4 |
| 03 · Linux & Dev Environment | 5–8 h | ≤ 6 |
| 04 · Electronics & Embedded Systems | 6–9 h | ≤ 7 |
| 05 · Robotics Fundamentals | 6–9 h | ≤ 9 |
| 06 · 6DOF Robotic Arm | 12–20 h | ≤ 12 |
Hour ranges come from each live stage's effort estimate on this site. Everyone's pace differs — treat this as a rough calendar, and add buffer for hardware delivery and debugging.
Worked example
Worked example: a realistic calendar
Say you can give 6 hours a week: one hour on weekdays and a little extra on the weekend. Set the planner above to 6 h/week and “Plan up to Stage 06”.
Code lab
Code lab: set up your lab notebook and check your tools
Real robotics labs keep notes. Run this in a terminal (Linux, macOS, or WSL on Windows) to create a simple folder structure and today’s notebook page. Stage 3 covers the terminal properly; for now, just paste and run.
# Create a simple lab-notebook folder structure in your home directory
mkdir -p ~/robotics-lab/notebook ~/robotics-lab/code ~/robotics-lab/photos ~/robotics-lab/datasheets
cd ~/robotics-lab

# Start today's notebook page from a template
cat > notebook/day-01.md <<'NOTE'
# Day 01 — Stage 0 Orientation
## Goal today
## What I tried
## What actually happened (numbers!)
## What broke / surprised me
## Next step
NOTE

ls -R ~/robotics-lab
Output (your home folder path will differ)
/home/you/robotics-lab:
code
datasheets
notebook
photos

/home/you/robotics-lab/code:

/home/you/robotics-lab/datasheets:

/home/you/robotics-lab/notebook:
day-01.md

/home/you/robotics-lab/photos:
Now check the tools later stages use. Your version numbers will be different, and that is fine.
# Check the tools you will use in later stages (versions will differ on your machine)
python3 --version
git --version
python3 -c "import math; print('Python maths works:', round(math.sqrt(2), 3))"
Example output (versions differ by machine)
Python 3.13.5
git version 2.47.3
Python maths works: 1.414
Real world
How real learners keep going
Successful lab learners keep a notebook: decisions, failures, measurements, and power incidents. That notebook becomes your Stage 18 capstone evidence trail.
Mistakes
Common mistakes on the journey
Hardware & safety
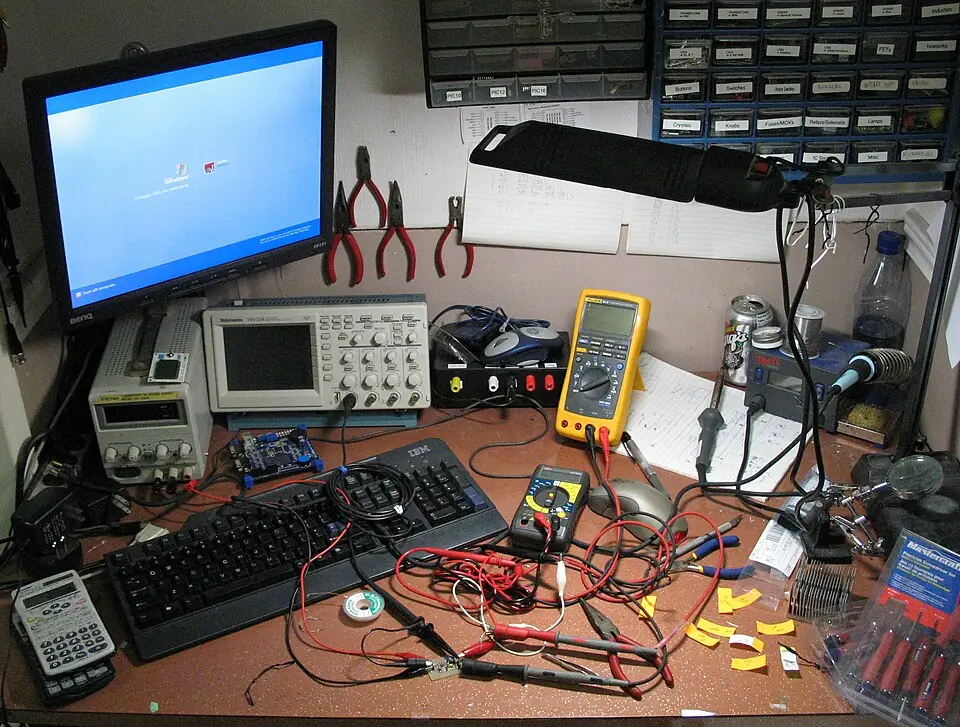
Hardware lab and safety notes
Set up a small, safe home lab bench before Stage 1.
- Starter kit: Arduino Uno + USB cable, breadboard, jumper wires, LEDs + 220 Ω resistors, push buttons, a 10 kΩ potentiometer, HC-SR04, one SG90 servo, a 4×AA pack or 5 V 2 A adapter for servos.
- Tools: small screwdriver set, wire stripper, multimeter, notebook.
- Keep drinks away from the bench and a clear space where moving parts can swing.
Debugging
Debugging: when it doesn’t work
| Symptom | Likely cause | Fix |
|---|---|---|
python3 not found | Python not installed or not on PATH | Install from python.org (tick “Add to PATH” on Windows) |
git not found | Git not installed | Install Git and reopen the terminal |
check_tools.sh says permission denied | Script not executable | chmod +x check_tools.sh or run with bash check_tools.sh |
| Arduino port missing | Charge-only USB cable or driver | Try a data cable; on Linux check ls /dev/ttyACM* |
Think
Think about it
Think
What is one skill you will practice on Stage 6 even if your math is still rough?
Experiment
Mini capstone: design your first robot
Bring together everything from Stage 0: sensors (Lesson 3), actuators (Lesson 4), controllers (Lesson 5), power (Lesson 6), feedback (Lesson 7) and robot type (Lesson 8).
Experiment
Design your first robot
You will need
- The capstone designer below
- Your lab notebook (day-01.md from the code lab works)
Steps
- Use the capstone designer below.
- Pick a type, sensors, controller, actuator, and power approach.
- Copy the generated architecture summary into your lab notebook.
- Under it, write one sentence each: how this robot senses, how it decides, and how it acts.
Mini capstone · Design your first robot
Robot type
Sensors (multi-select)
Controller
Actuator class
Power approach
Generated architecture summary
Type: Arm
Sensors: Encoders, Distance
Controller: MCU only
Actuation: Hobby servos
Power: USB logic + separate motor PSU

Architecture:
  World → [Encoders, Distance] → [MCU only] → [Hobby servos] → World
  MCU owns the fast loop; keep tasks bounded and measured.
  Power: size for stall/peak current; share ground with logic; never power motors from a weak USB port alone.
Knowledge check
Check your understanding
Knowledge check
1. Which stage is the live flagship hardware path today?
2. Planned roadmap stages should…
3. A good Orientation outcome is…
4. You can study 5 hours a week and a stage is estimated at 10–15 h. Roughly how many weeks should you plan?
5. Which notebook entry is most useful later?
Practice quiz
Mini assignment
Hands-on assignment
Mini assignment
Journey contract
Write three bullets: (1) your near-term build goal, (2) your safety rule, (3) your next stage after Orientation (0→6 jump is allowed if you accept learning foundations in parallel).
Deliverables
- Three-bullet journey contract
Add a fourth line with your weekly study hours and the number of weeks the planner gave you, plus your buffer. Save it as ~/robotics-lab/notebook/journey.md next to your day-01 page.
Do this, step by step
- Run
setup_lab_notebook.shto create~/robotics-lab/notebookand your day-01 page. - Run
check_tools.shand copy the output (Python and Git versions, and the maths check). - Use the study planner above with your real weekly hours and note the number of weeks.
- Write your journey contract (three bullets + a fourth line with hours, weeks and buffer) in
journey.md.
Stuck? Hints, one at a time
- Hint 1: If a tool is missing, install it now — Stage 1 and 2 need Python, Stage 3 needs a terminal.
- Hint 2: A buffer of 20–30 % on the planner’s weeks is realistic for students and working people.
- Hint 3: Your safety rule should be specific: “servo supply is separate, grounds joined” beats “be careful”.
Challenges (pick by level)
- 🟢 Easy: Make your first Git commit of the notebook folder.
- 🟡 Medium: Make a one-page checklist of parts you own vs parts you need for Stage 4.
- 🟠 Hard: Write a script that appends today’s date and study hours to
journey.md.
Next step
You have finished Stage 0. Continue to Stage 1 — Math for Robotics and Stage 2 — Programming & Python. If you are eager to build, look ahead to Stage 6 (the 6DOF arm) but keep the foundations going in parallel.
Sources
- Python downloads — install Python 3.
- Git documentation — version control basics.
- Arduino IDE downloads — install the Arduino IDE.
- ROS 2 Jazzy documentation — robot software you will meet in Stage 10.
- Arduino — UNO R3 docs — the board used across the course.
- Photos: Wikimedia Commons (credits under each image).
Self-attested for now — keep artifacts in your lab notebook.
Complete
Today's goal
0 of 1 done today
Mark this lesson complete when you have worked the experiment, knowledge check, and assignment (even roughly).